
 Dansk
Dansk
 English
 Deutsch
The Marble Chamber
The Marble Chamber at Rosenborg is one of the museum’s most unusual rooms. The room is unique due to its original function and because of the materials used to build it. But the room is also special because it is more or less intact – in the 340 years that have passed since the room was completed in 1670, its architectonic elements have only been subjected to repairs, never to rebuilding.
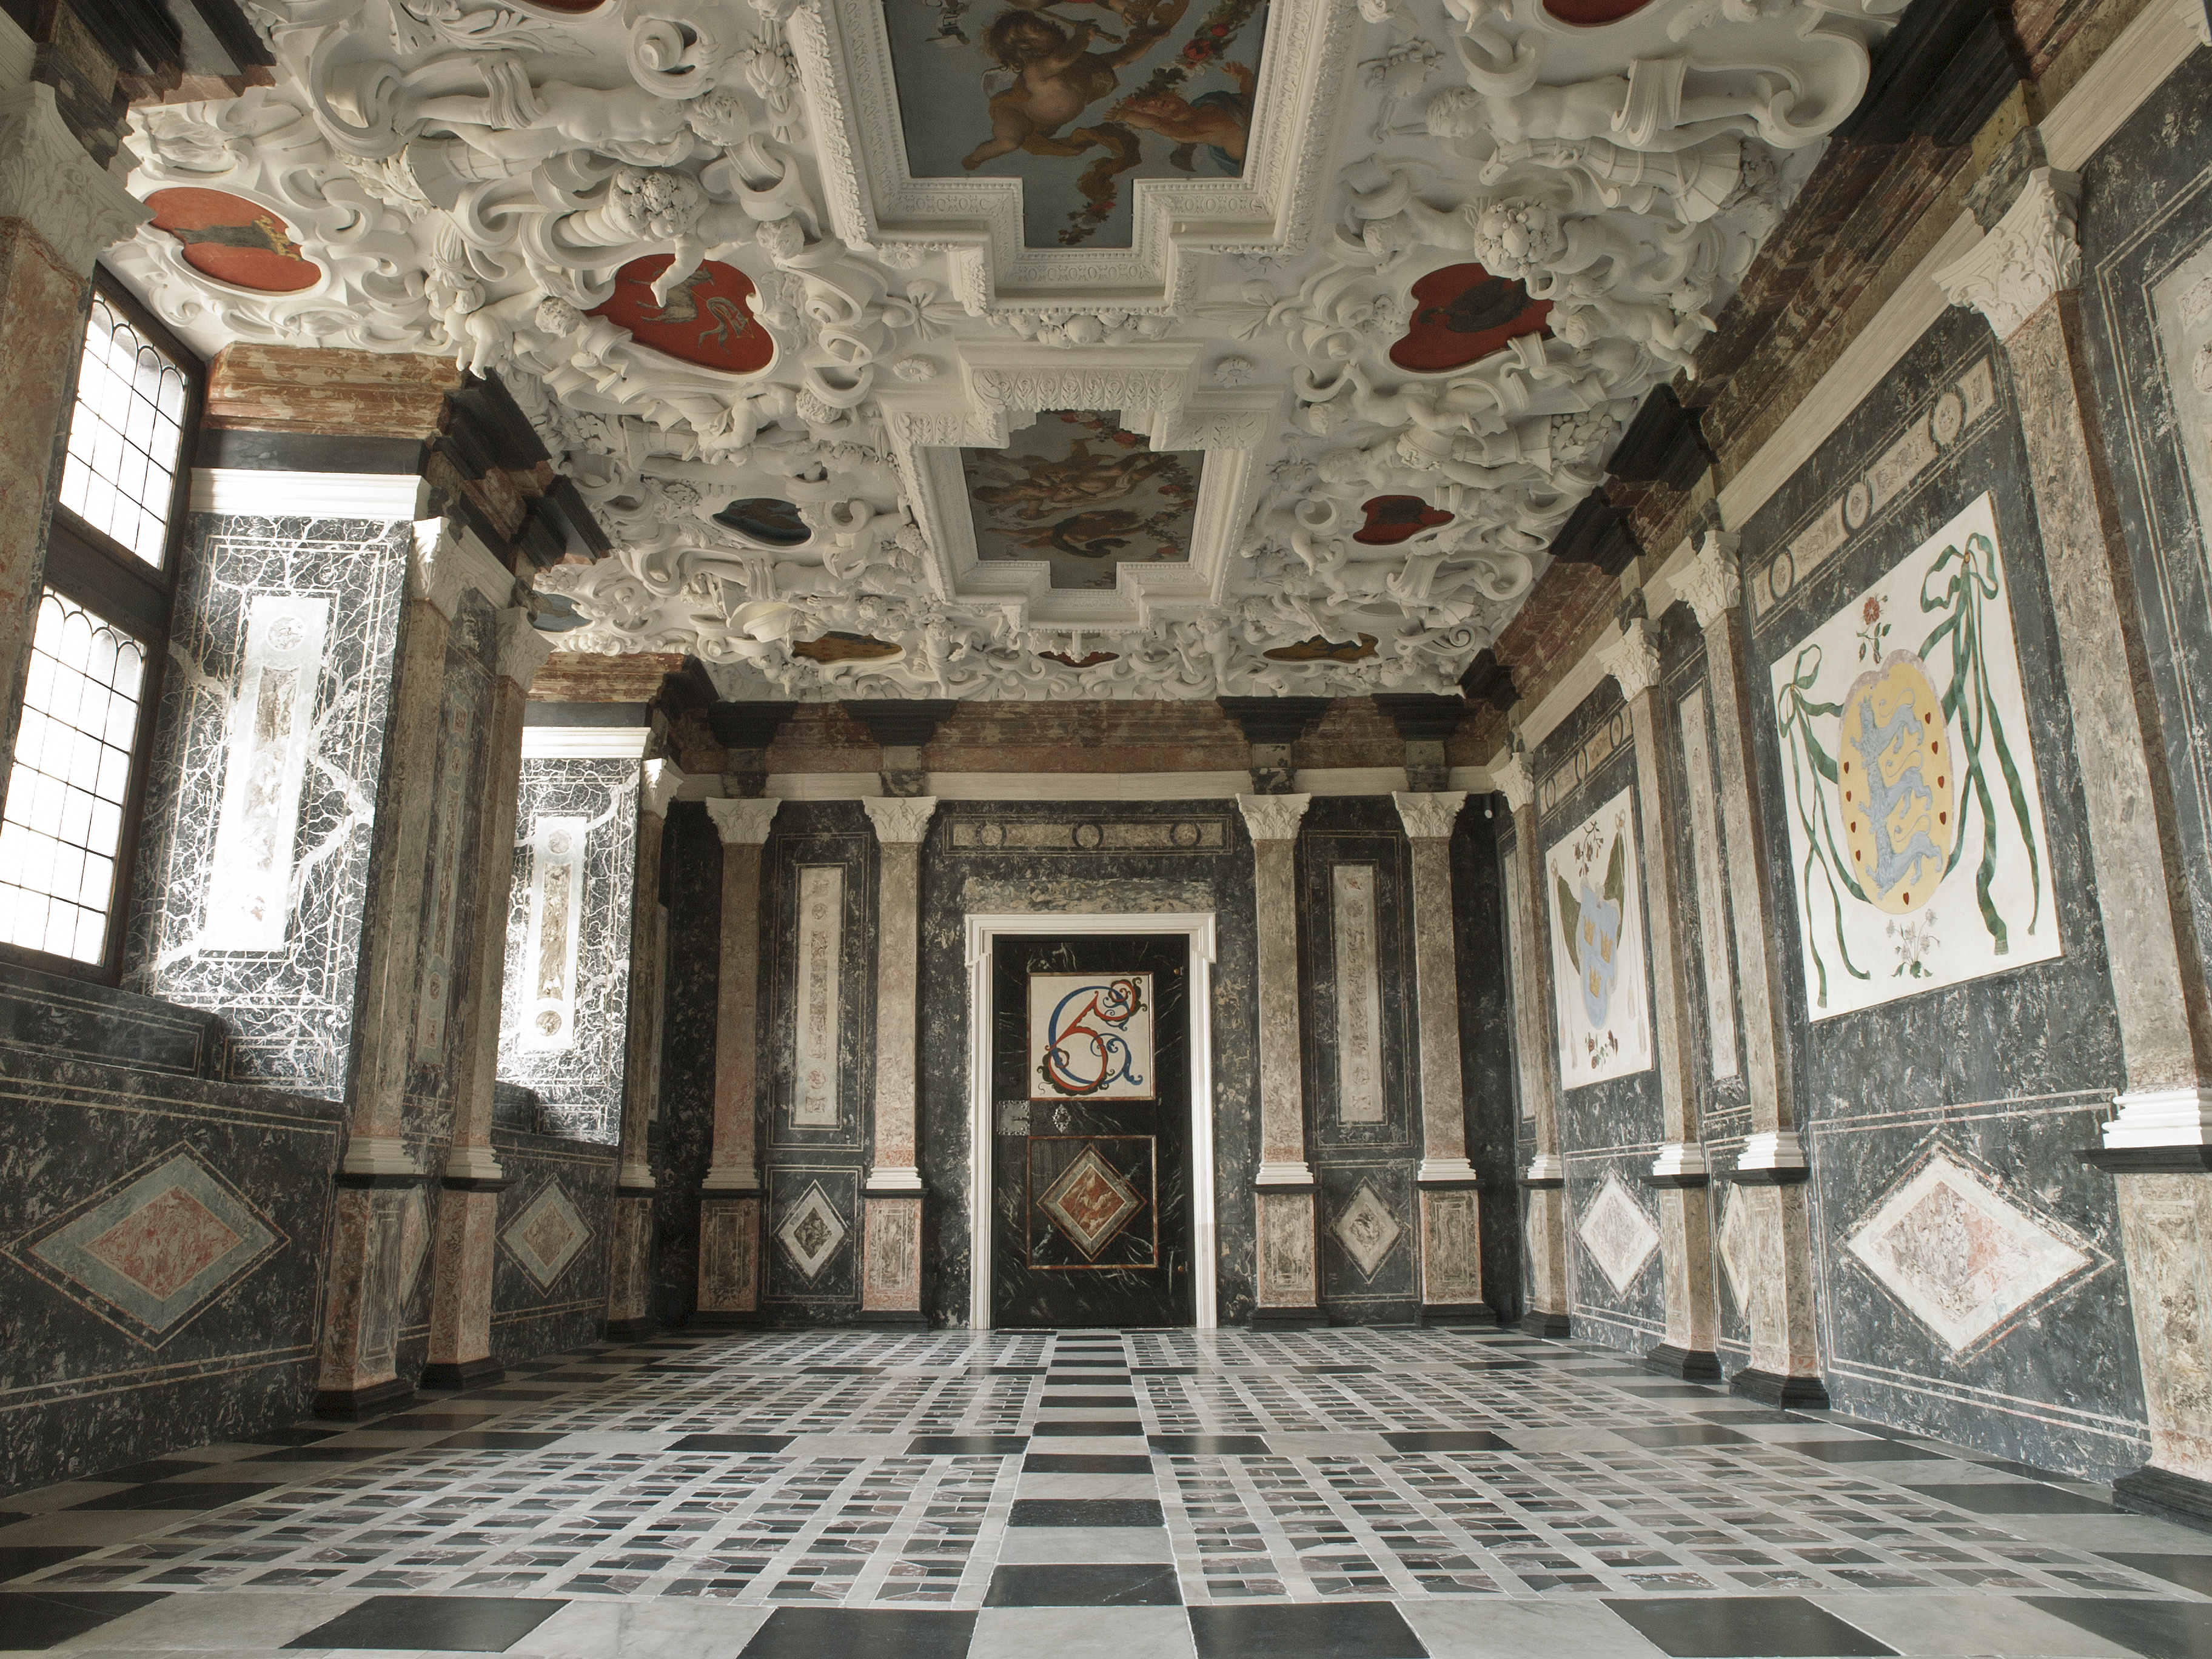
The Marble Chamber as it looked prior to treatment. The walls were cracked, matt, and dull, the ceiling was dirty and the paintings in a bad condition, and the stones in the mosaic floor were loose.
The Condition of The Marble Chamber
In spite of it being well built, there is no way to avoid a room like the Marble Chamber becoming worn. Indeed, the traces of older repairs were to be seen everywhere in the room. In 2010 the condition of the Marble Chamber’s stucco walls, floor, the pigment layers on the doors and the paintings in the ceiling, had become so bad that thorough treatment was necessary.
Watch video of The Marble Chamber before restoration.
The conservation and restoration of the various artistic and architectural elements was intended to preserve the room’s originality. It was forbidden to alter constructions, add new architectural elements, or remove original material.
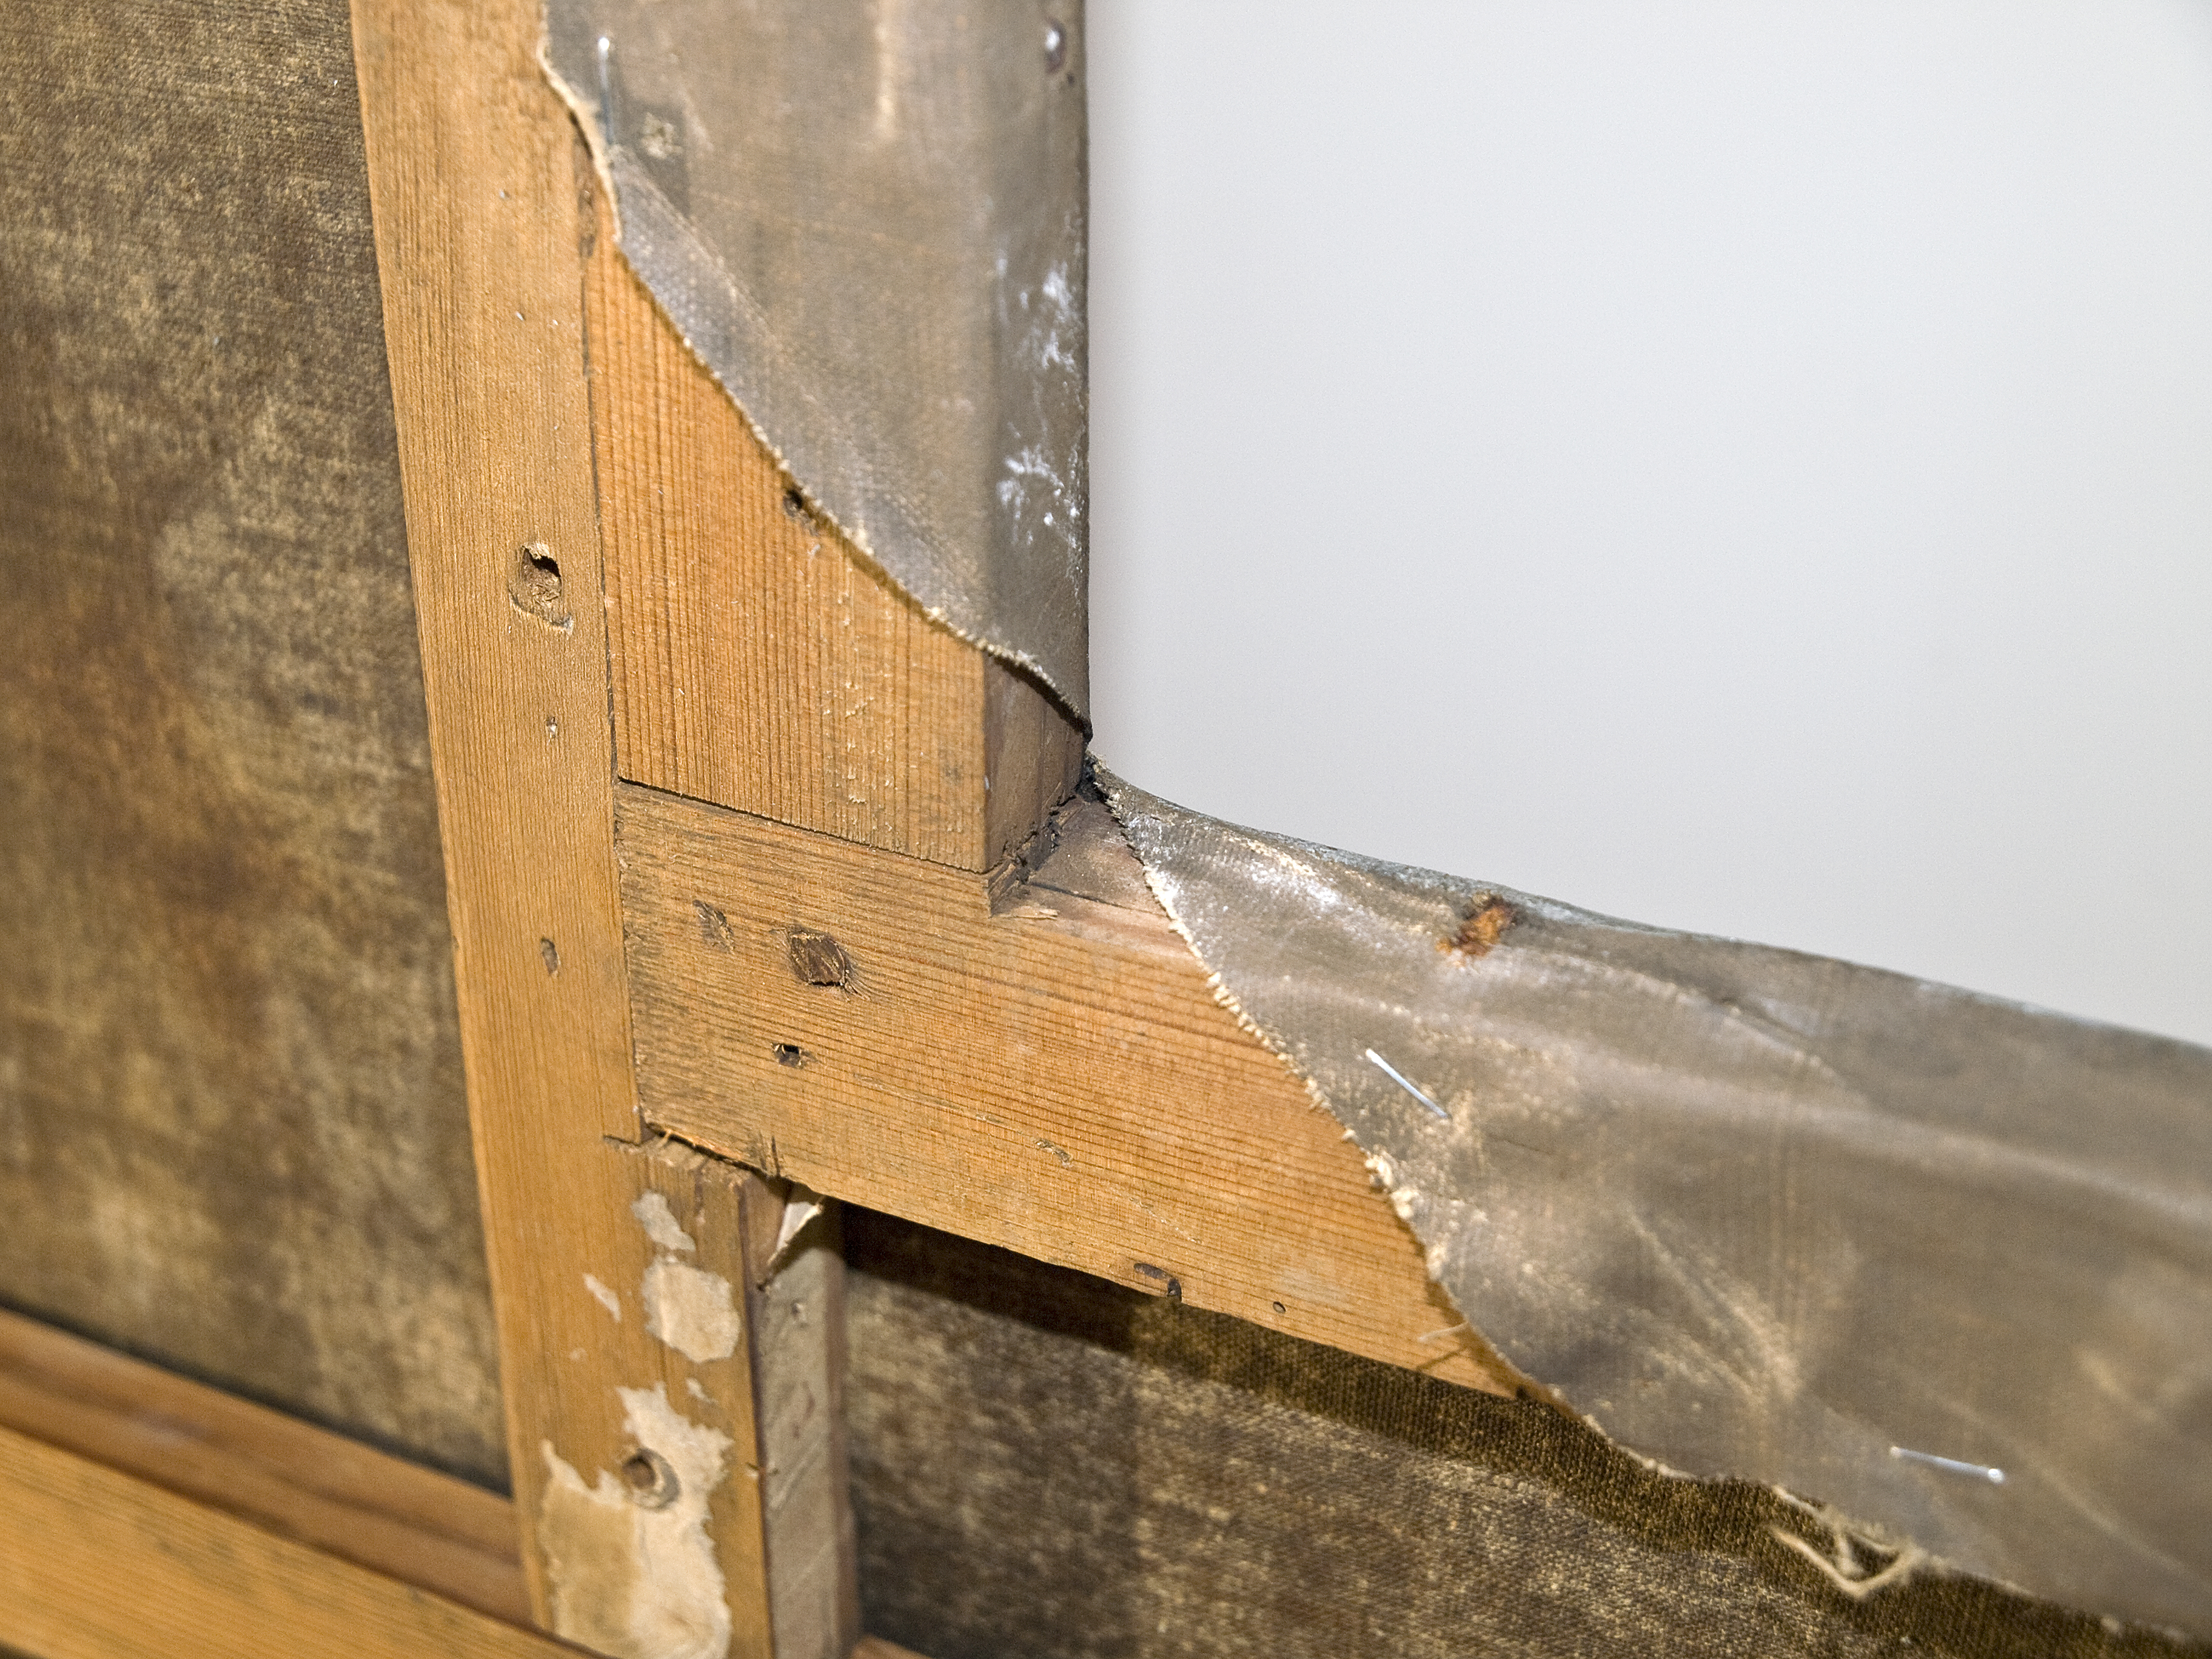
The damage to the walls, floors, woodwork, paintings, and ceilings was very different depending on the original materials and the repairs that had been undertaken over time, and this required planning in the choice of conservation methods and materials.
The Working Process
Rosenborg is organised so that you walk in one direction through the castle and thus pass through all the rooms, but The Marble Chamber lies in the middle of this route around the ground floor, so visitors to the museum had to be led back the way they had come in order to get to the other end of the castle. The Marble Chamber is so small that visitors cannot walk through at the same time as work is being done in the room. To avoid visitors having to meet a closed door twice during their visit, glass walls were fitted in the two doorways, so that the visitors could follow the conservators’ work.
One year and two months was reserved for the work, and as almost all conservation work takes time, several processes had to be worked on simultaneously.
First the mosaic elements were removed from the floor and protective plates laid so that the stucco workers (walls) and paintings conservators (doors and ceiling paintings) could work simultaneously.
Due to the limited space, the paintings conservators moved everything that could be detached – doors and oil paintings – out of The Marble Chamber and down to Amalienborg, where the museum has its paintings conservation workshop. During this period the stucco workers had the room to themselves. When the paintings conservators had finished with the doors and were to continue with the small marble-clad connecting corridors to the neighbouring rooms, the stucco workers had completed so much of their work that there was space for the conservators. Work now continued in tandem, and specially constructed mobile scaffolding was installed, so that the paintings conservators could also work on the 15 ceiling medallions. At the end of the period the oil paintings were hung again and finally the mosaicists could enter the room and lay the mosaic elements.
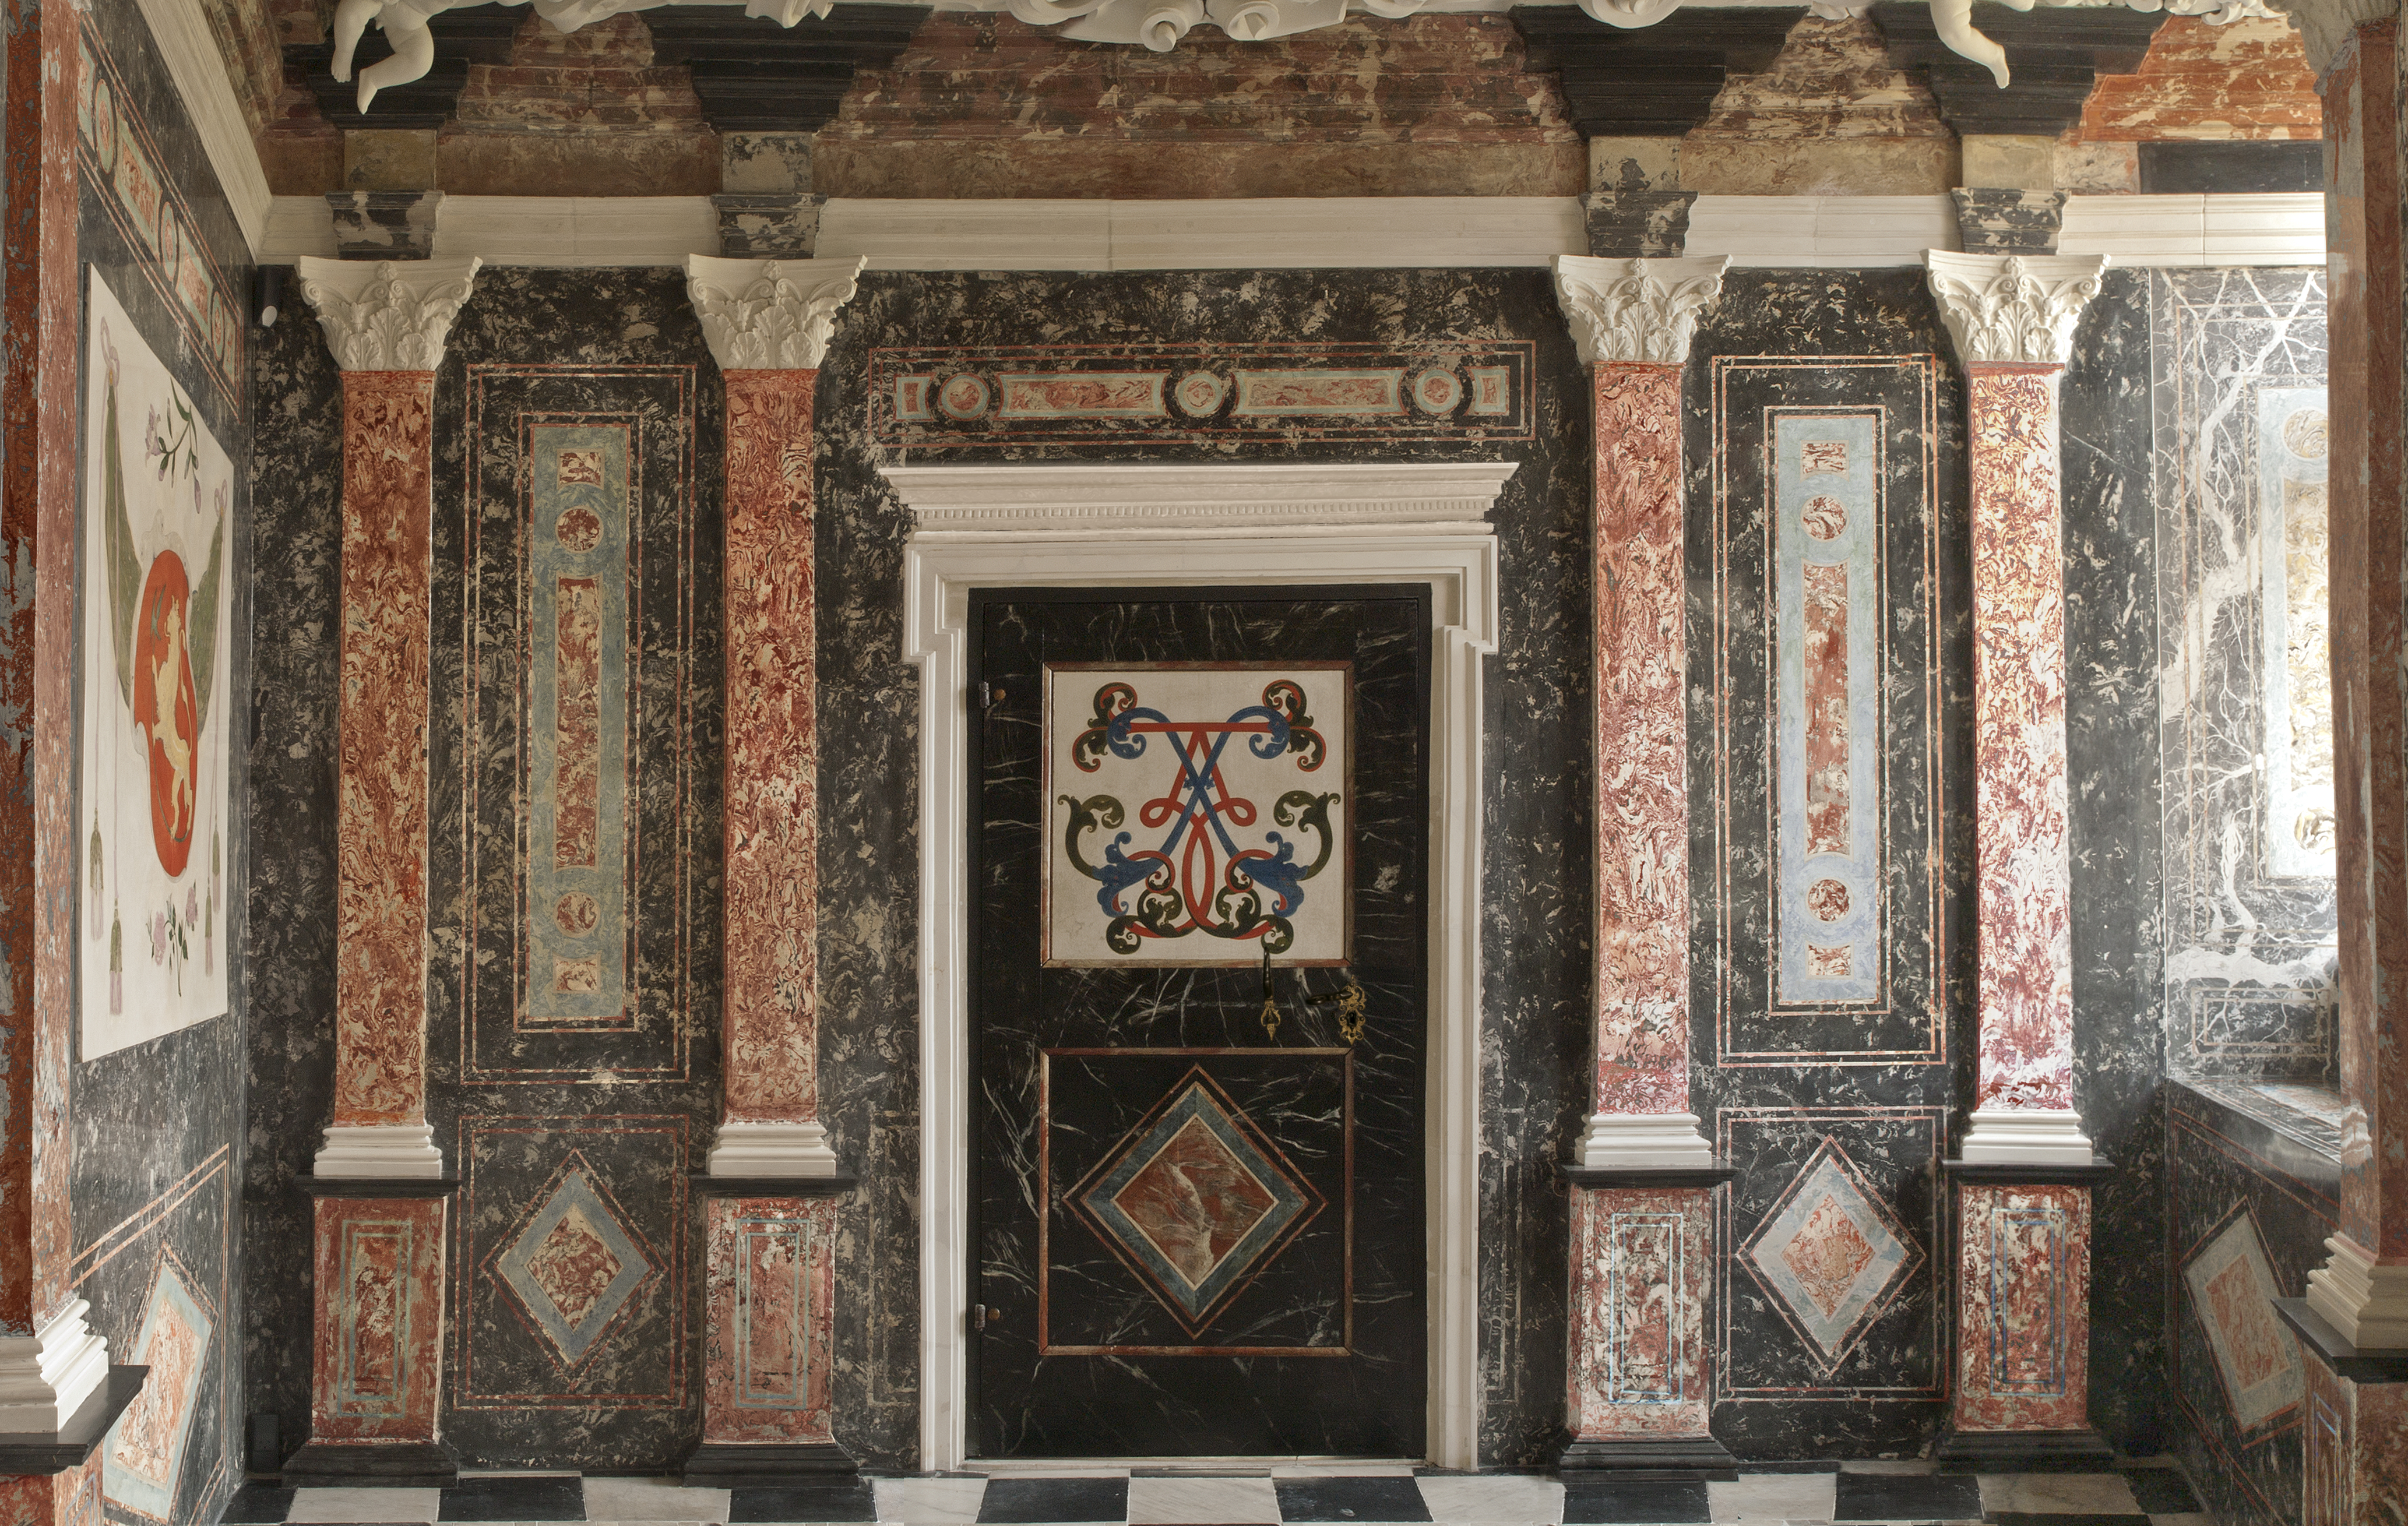
The Condition of the Walls
The condition of the walls was critical in several places due to the many hollow spaces behind the scagliola. Safety paper had been stuck to the scagliola in several places to stop it from falling off. Several of the scagliola pilasters were very loose and some had been pushed several centimetres out from the wall. There were also unsightly old repairs to the scagliola.
Some very obvious damage to the scagliola was the fading and discolouration of the scagliola’s original colours. Today the walls have a predominantly grey-black look, but originally the black and white colours were supplemented by bright red, yellow and blue colours. The changes in colour in the scagliola surfaces are due to the use of plant pigments (probably indigo) and cinnabar red and yellow in the original scagliola. These pigments and dyes are not lightfast and the surfaces darken and become grey-brown in colour. This damage is irreparable. The discolouration of the scagliola affects only the uppermost layers and it is possible to sand it away, which would reveal the true colours, but after a number of years the colours would simply fade again. It would then be necessary to repeat the sanding and eventually there would no material left.
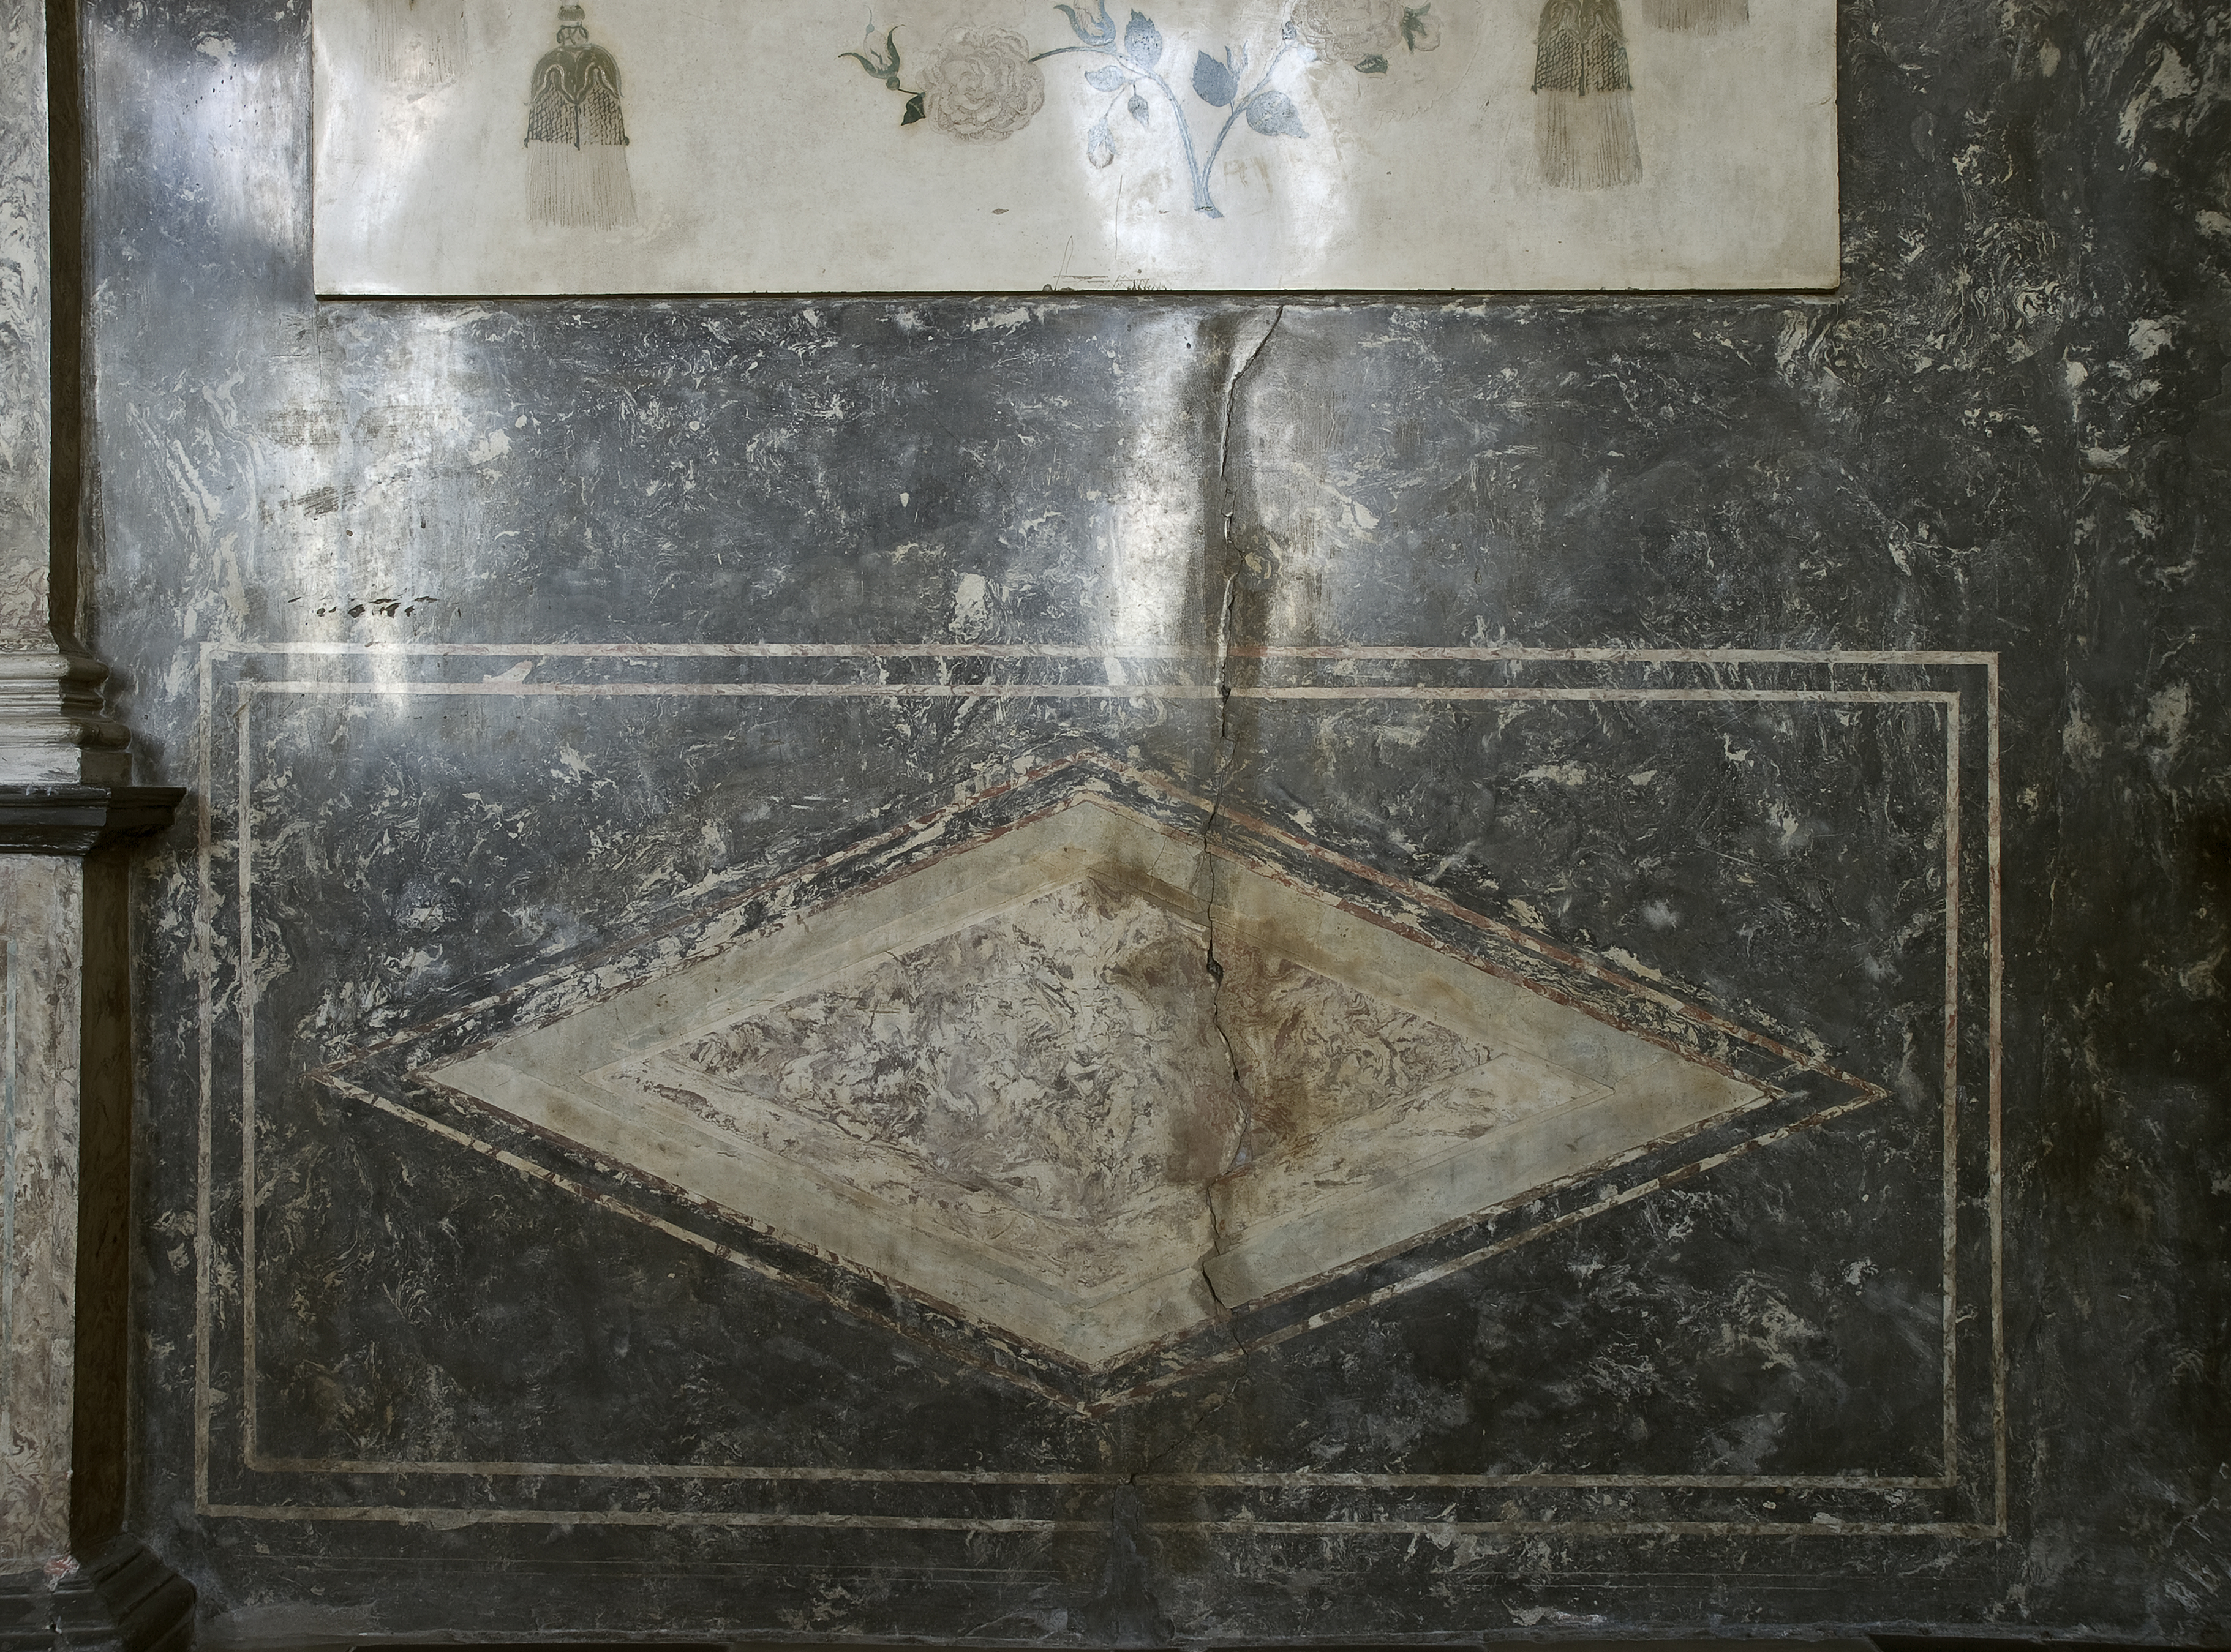
A crack in the scagliola had previously been repaired, but the crack had opened again and the repair had become discoloured.
The Treatment of the Walls
A treatment such as the one carried out on the walls of The Marble Chamber by the two stucco workers Manfred Siller and Peter Funder, involves every square centimetre of the walls being surveyed. If a hollow space is found it has to be secured in various ways. On the wall with windows there was severe damage caused by rusty nails, which had pushed the stucco layers out from the wall. Here large pieces of scagliola had to be carefully broken off, the rusty nails removed, and the scagliola remounted. Cracks were filled with scagliola mass, which was sanded and polished to the same standard as the original scagliola.
On the profile friezes at the edges of the ceiling dirt and wax had to be removed. Loose and hollow profile parts were secured here too.
Of the 18 pilasters with plinths, four pilasters near the wall with windows had to be removed and remounted.
The scagliola in the three window bays was very worn and damaged by people sitting down. There were many nicks and scratches in the surface. The difference in levels couldn’t be evened out by sanding, as the scagliola had delicate inlaid veining. Sanding would have caused these details to be lost. Instead the damage was filled out with new scagliola, after which the new material was sanded and polished.
The three pictures of coats of arms on the wall were cleaned in an especially gentle way and minor damage was fixed. Finally they were polished with pumice stone and lime stucco. Unsightly spots were found on the white ground of the three pictures. These were toned down.
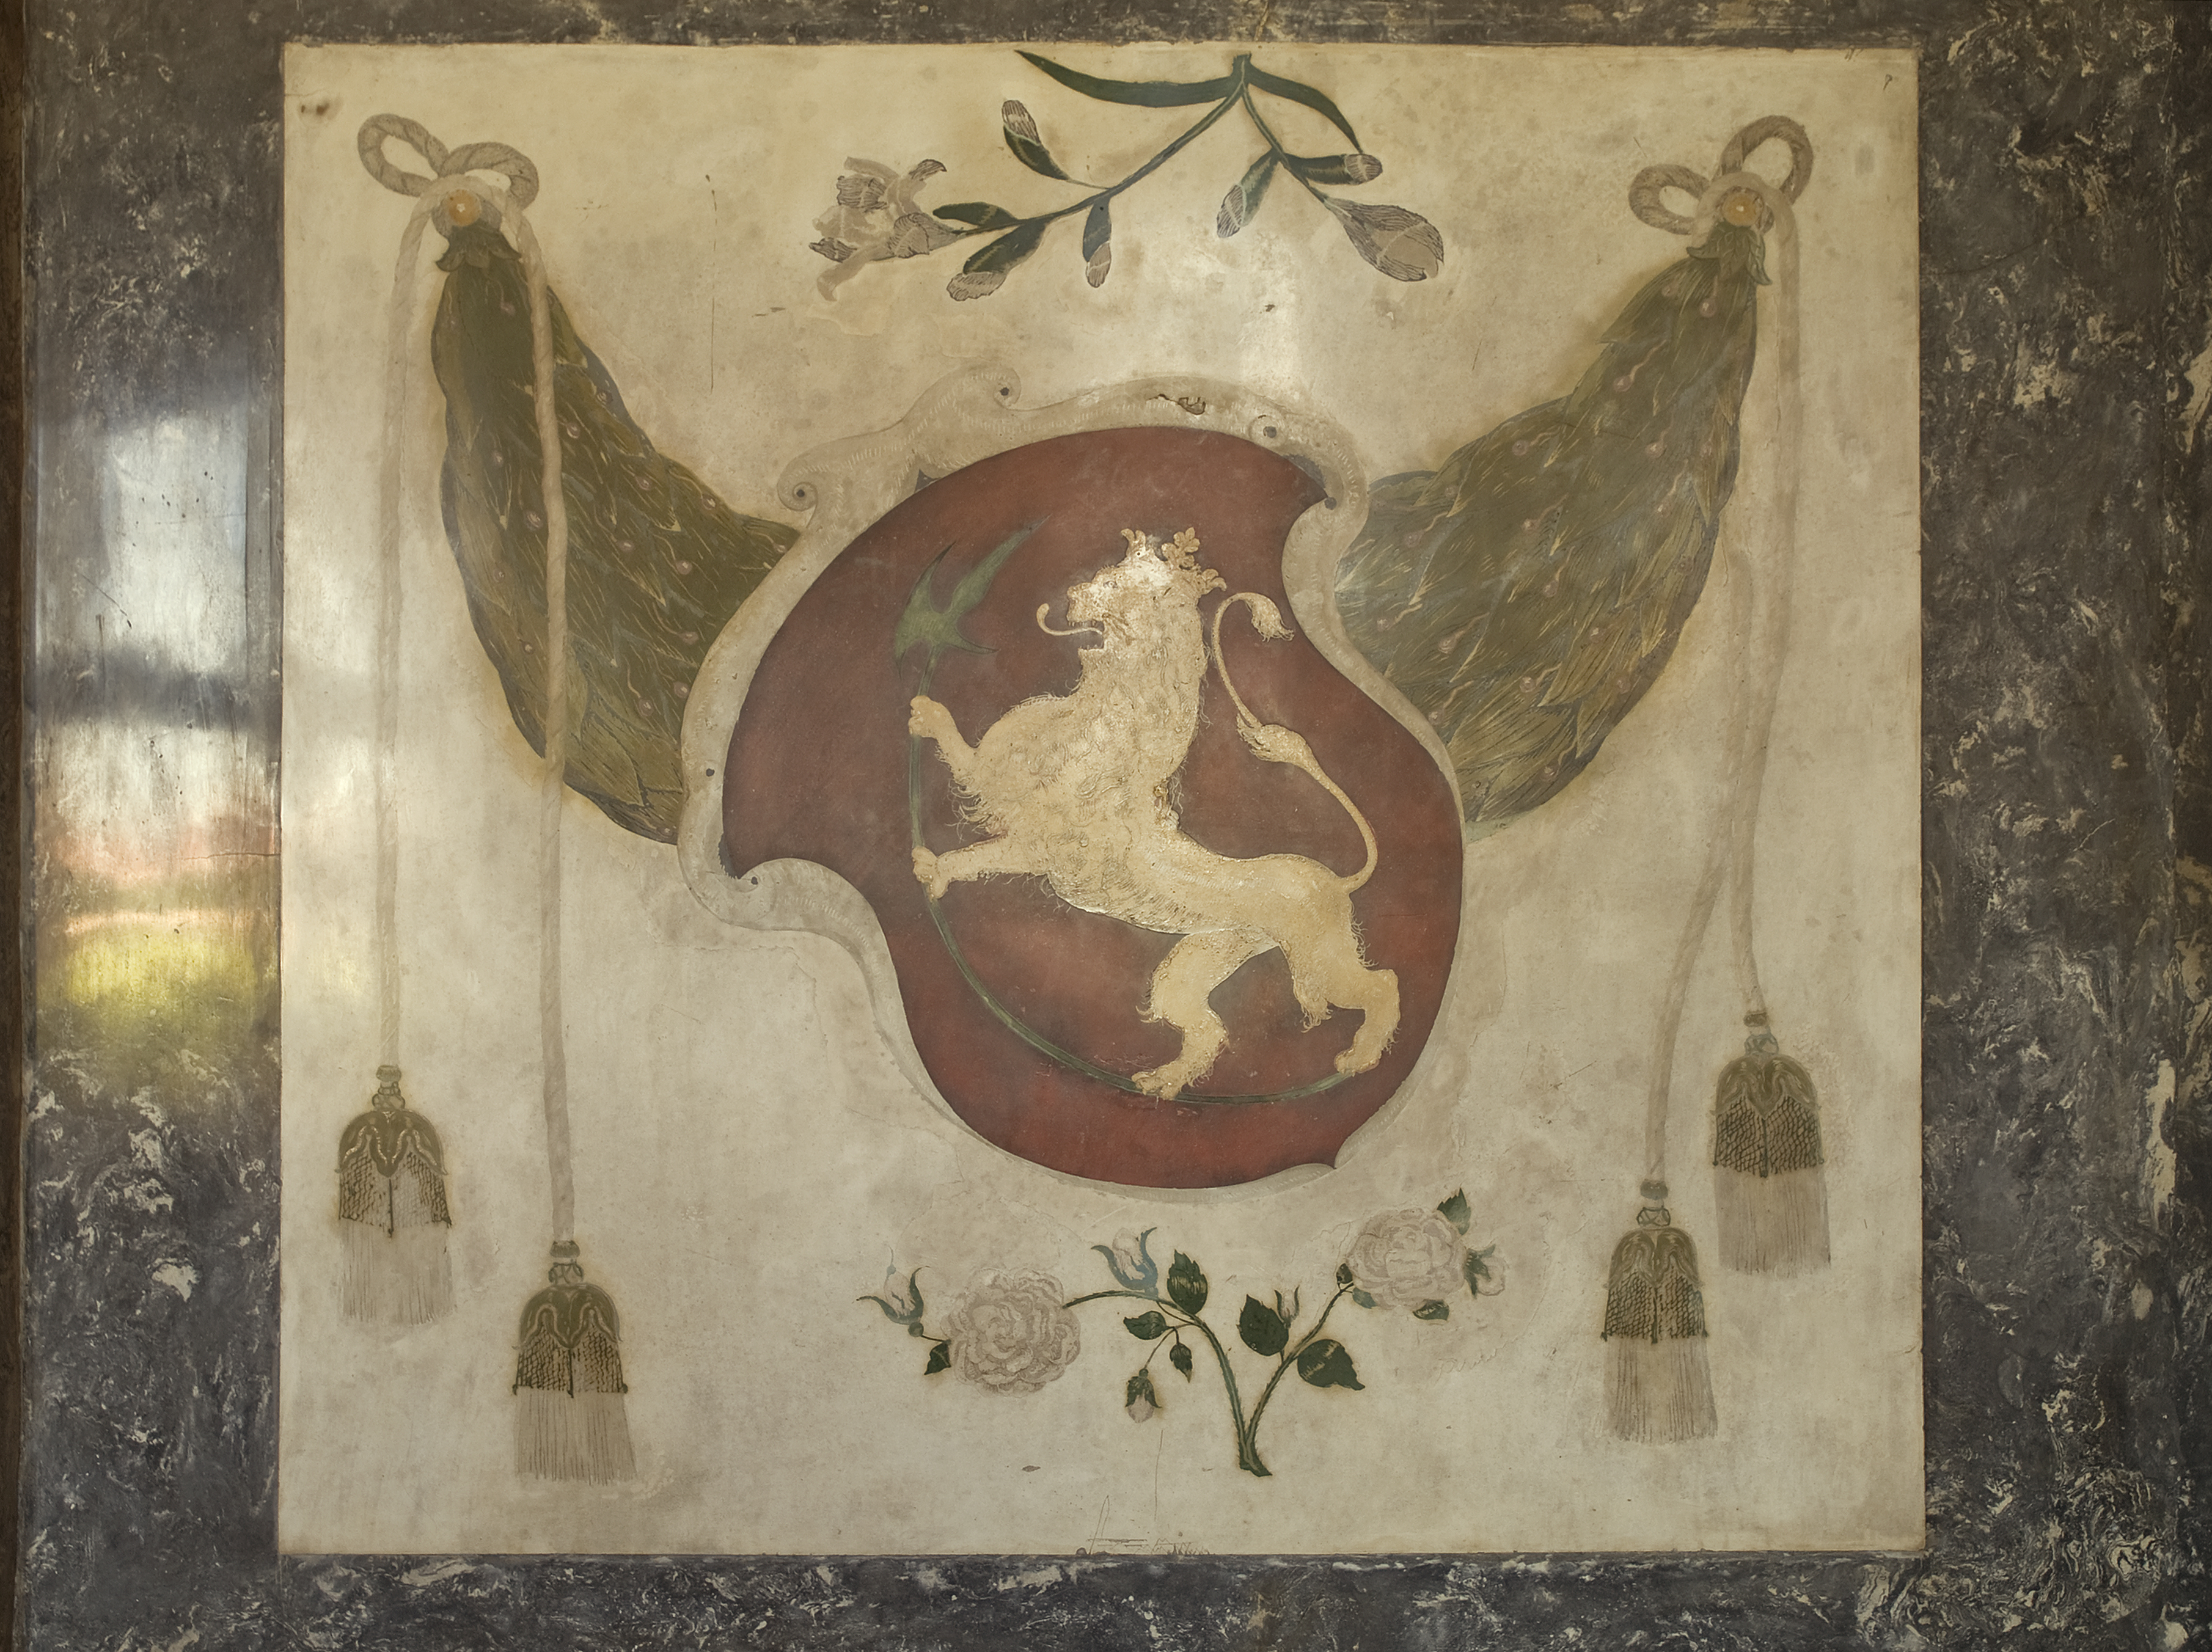
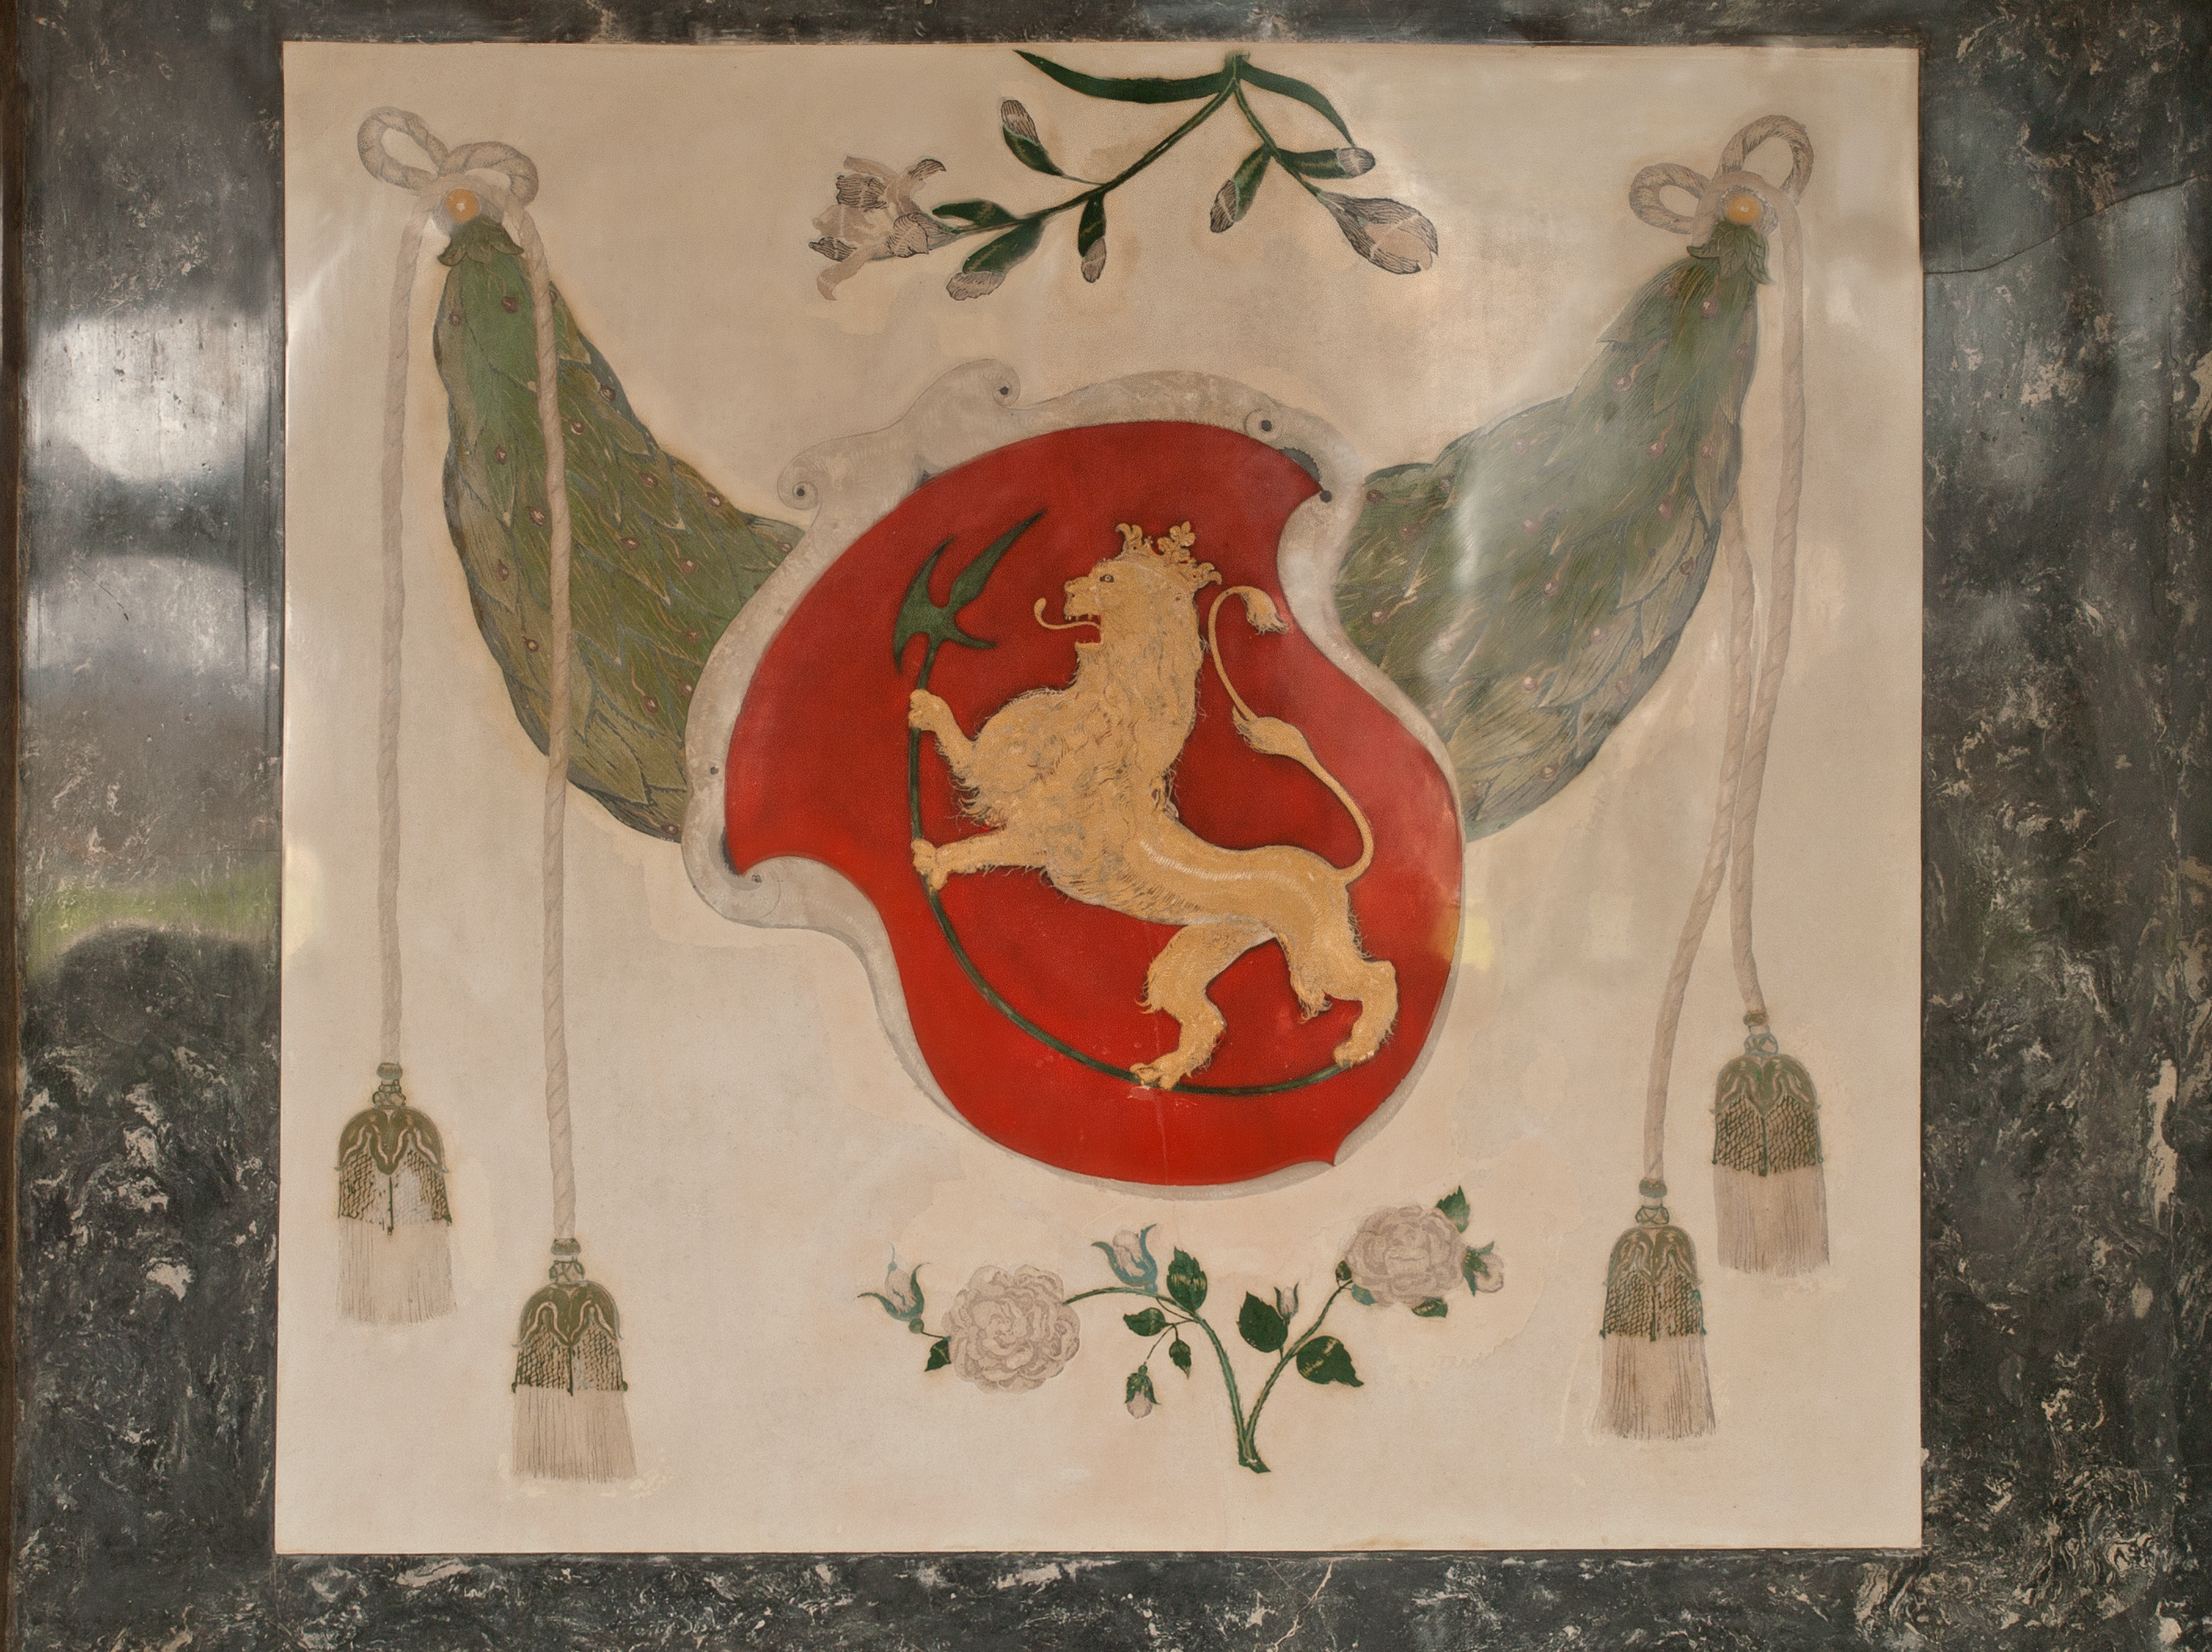
The picture of the crowned lion before and after treatment.
The two white architraves are also made of scagliola, and both were very unstable and had to be secured. The unsightly old repairs were sanded with pumice stone and damage was improved with scagliola in the original white colour. Finally the scagliola was rubbed everywhere with a mixture of carnauba and beeswax and polished so that only a thin film of wax remained on the surface of the scagliola. In this way the shiny surface was recreated and the colours stand out with greater depth and glow. It was not possible to treat the discolouration of the wall scagliola, caused by the use of non-lightfast pigments in the original stucco, as this would involve sanding, and it was therefore not possible to recreate the original, very intense play of colour. A digital reconstruction of the original play of colour was, however, produced.
Reconstruction of The Marble Chamber’s original colours. The reconstruction was undertaken digitally, the faded colours being replaced by the original colours. The colours which had not faded were not touched.
Watch the video of stucco worker Peter Funder talking about scagliola and the damage to The Marble Chamber.
The ceiling before treatment.
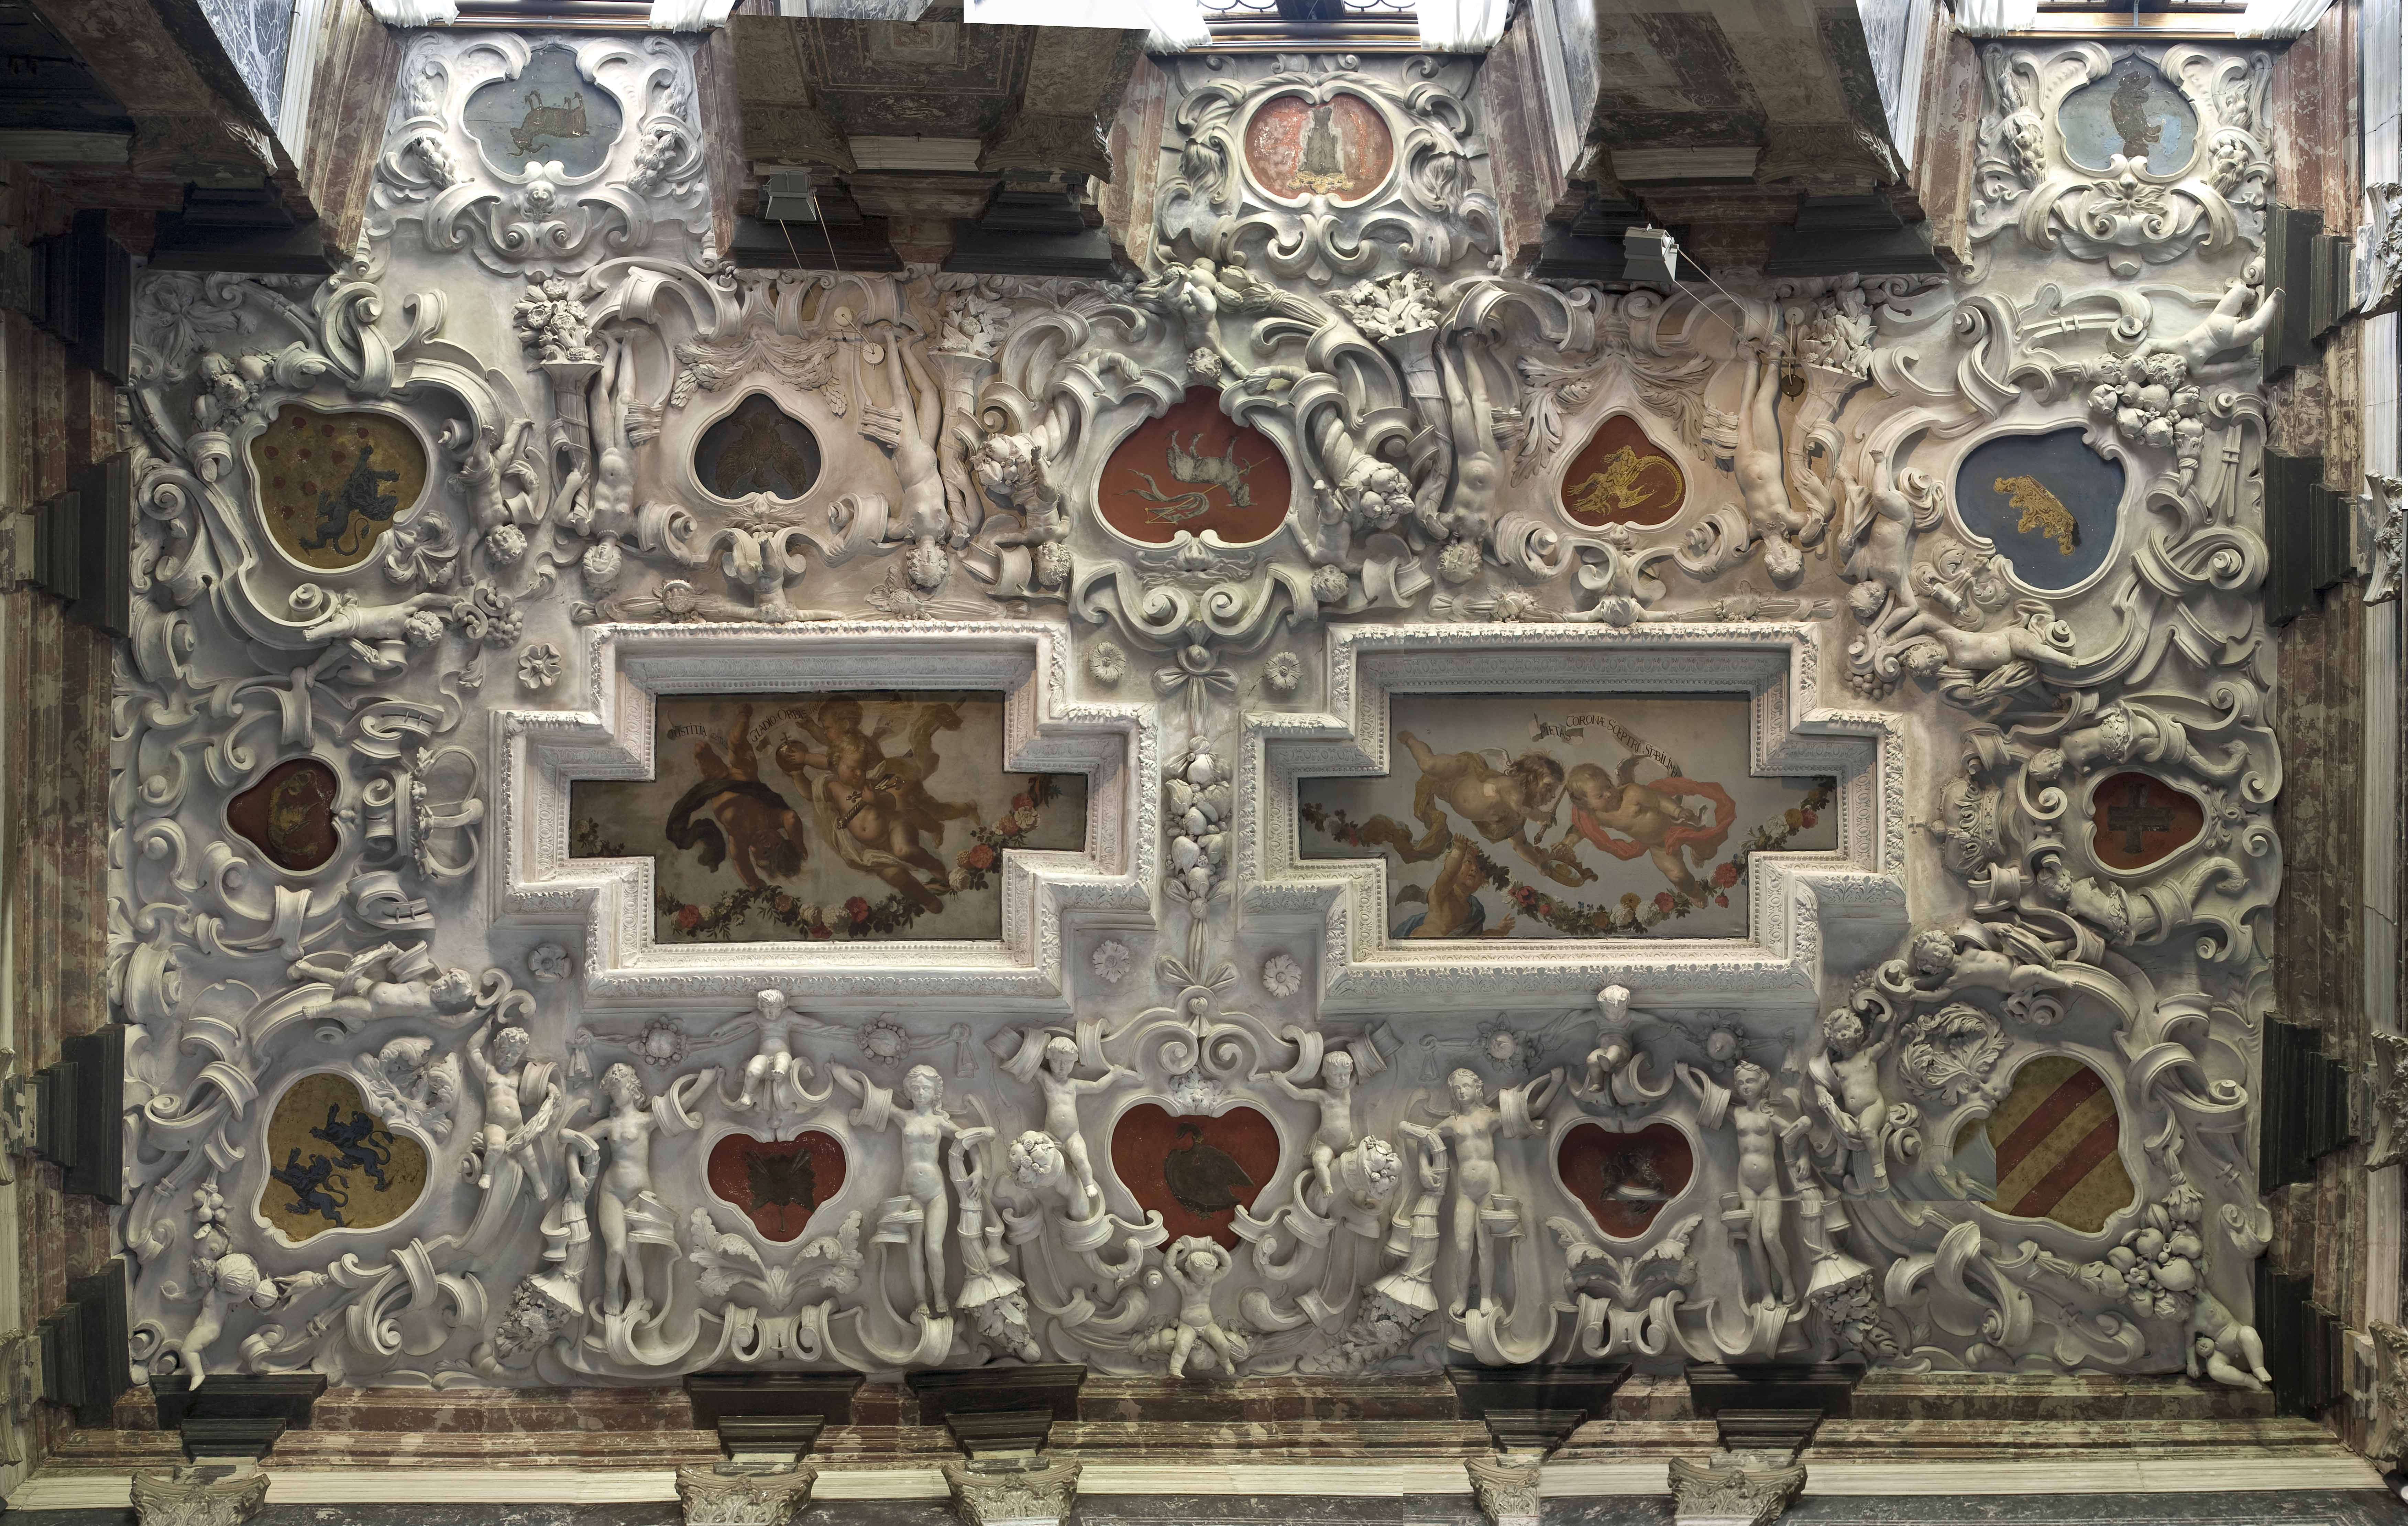
The Condition of the Stucco Ceiling
The stucco on the ceiling had been rudimentarily improved in 1982. Large cracks had been repaired and the ceiling had been whitened. But by 2010 the ceiling had again become dirty and was full of major cracks.
The Condition of the Paintings on Canvas
The two oil paintings in the middle of the ceiling are painted on canvas stretched on frames. They were warped and very dirty. The varnish was very yellowed and there were inexplicable dark patches and spots on both pictures, but the one painting looked to be in much worse condition than the other.

One of the ceiling paintings, oil on canvas, before treatment. The painting is spotted and the background grey instead of light blue.
Dismounting of the Canvas Paintings from the Ceiling
Work on the oil paintings on the ceiling began with removing them, partly because the stucco workers had to conserve the stucco ceiling and partly so that the paintings conservators could better treat the paintings.
The two central ceiling paintings were nailed to the ceiling with long iron nails, and in order to reach the nails the conservators had to scrape a newer plaster filling out from between the edges of the frame and the painting.
While the ceiling paintings were removed the stucco workers repaired the damage to the ceiling and whitened it.
Treatment of the Paintings on Canvas
The pigment layer was firmly attached to the canvas, which testifies to the artist’s good technique. So the first thing conservator Berit Møller did was to clean the painting, as there was no loose pigment which had to be secured first.
The paintings were cleaned of discoloured varnish and it could then be seen why the blue background colour of the two paintings was so different. The difference was most obvious in the light blue sky background. This difference between the two paintings was very strange, but could be explained. Investigation of the two paintings’ pigment layers revealed that the discolouration was caused by an earlier, harsh cleaning.
Watch video of the treatment of the ceiling paintings (oil on canvas).
On Bizarre Discoveries
During the cleaning of one of the paintings some strange traces appeared in the painting’s pigment layers. They only became visible when the pigment layer was moistened with solvent during the cleaning process. As the cleaning process progressed, it became noticeable that the dark, brownish shadows formed what looked like a larger figure. The figure had the size of one of the putti (the little angels) that carry the royal crown and the sceptre. This putto looked as though it held one of the banners. During the cleaning process several minor corrections were found which were made by the artist.
Watch video of the hidden angel.
Much about the paintings’ condition and history can be seen from their backs and edges. It can for example be seen that they are stretched on very old frames. They seem to be the original frames, but there were some adjustment problems when hanging them in 1670. The pictures didn’t fit the spaces in the stucco ceiling properly, and they had to be altered a little in order to get the paintings into position. The two rectangular ‘wings’ have been turned a little in relation to the planned shape, and the changes can be seen on both the frame and the canvas. Supporting strips of wood have been added to the frame, and part of the motif on the canvas has been bent over the edge of it. On the opposite side of the painting pigment layers are missing – here it has been painted over with a light blue pigment. This can be detected because it is more transparent and has a rather different tone.
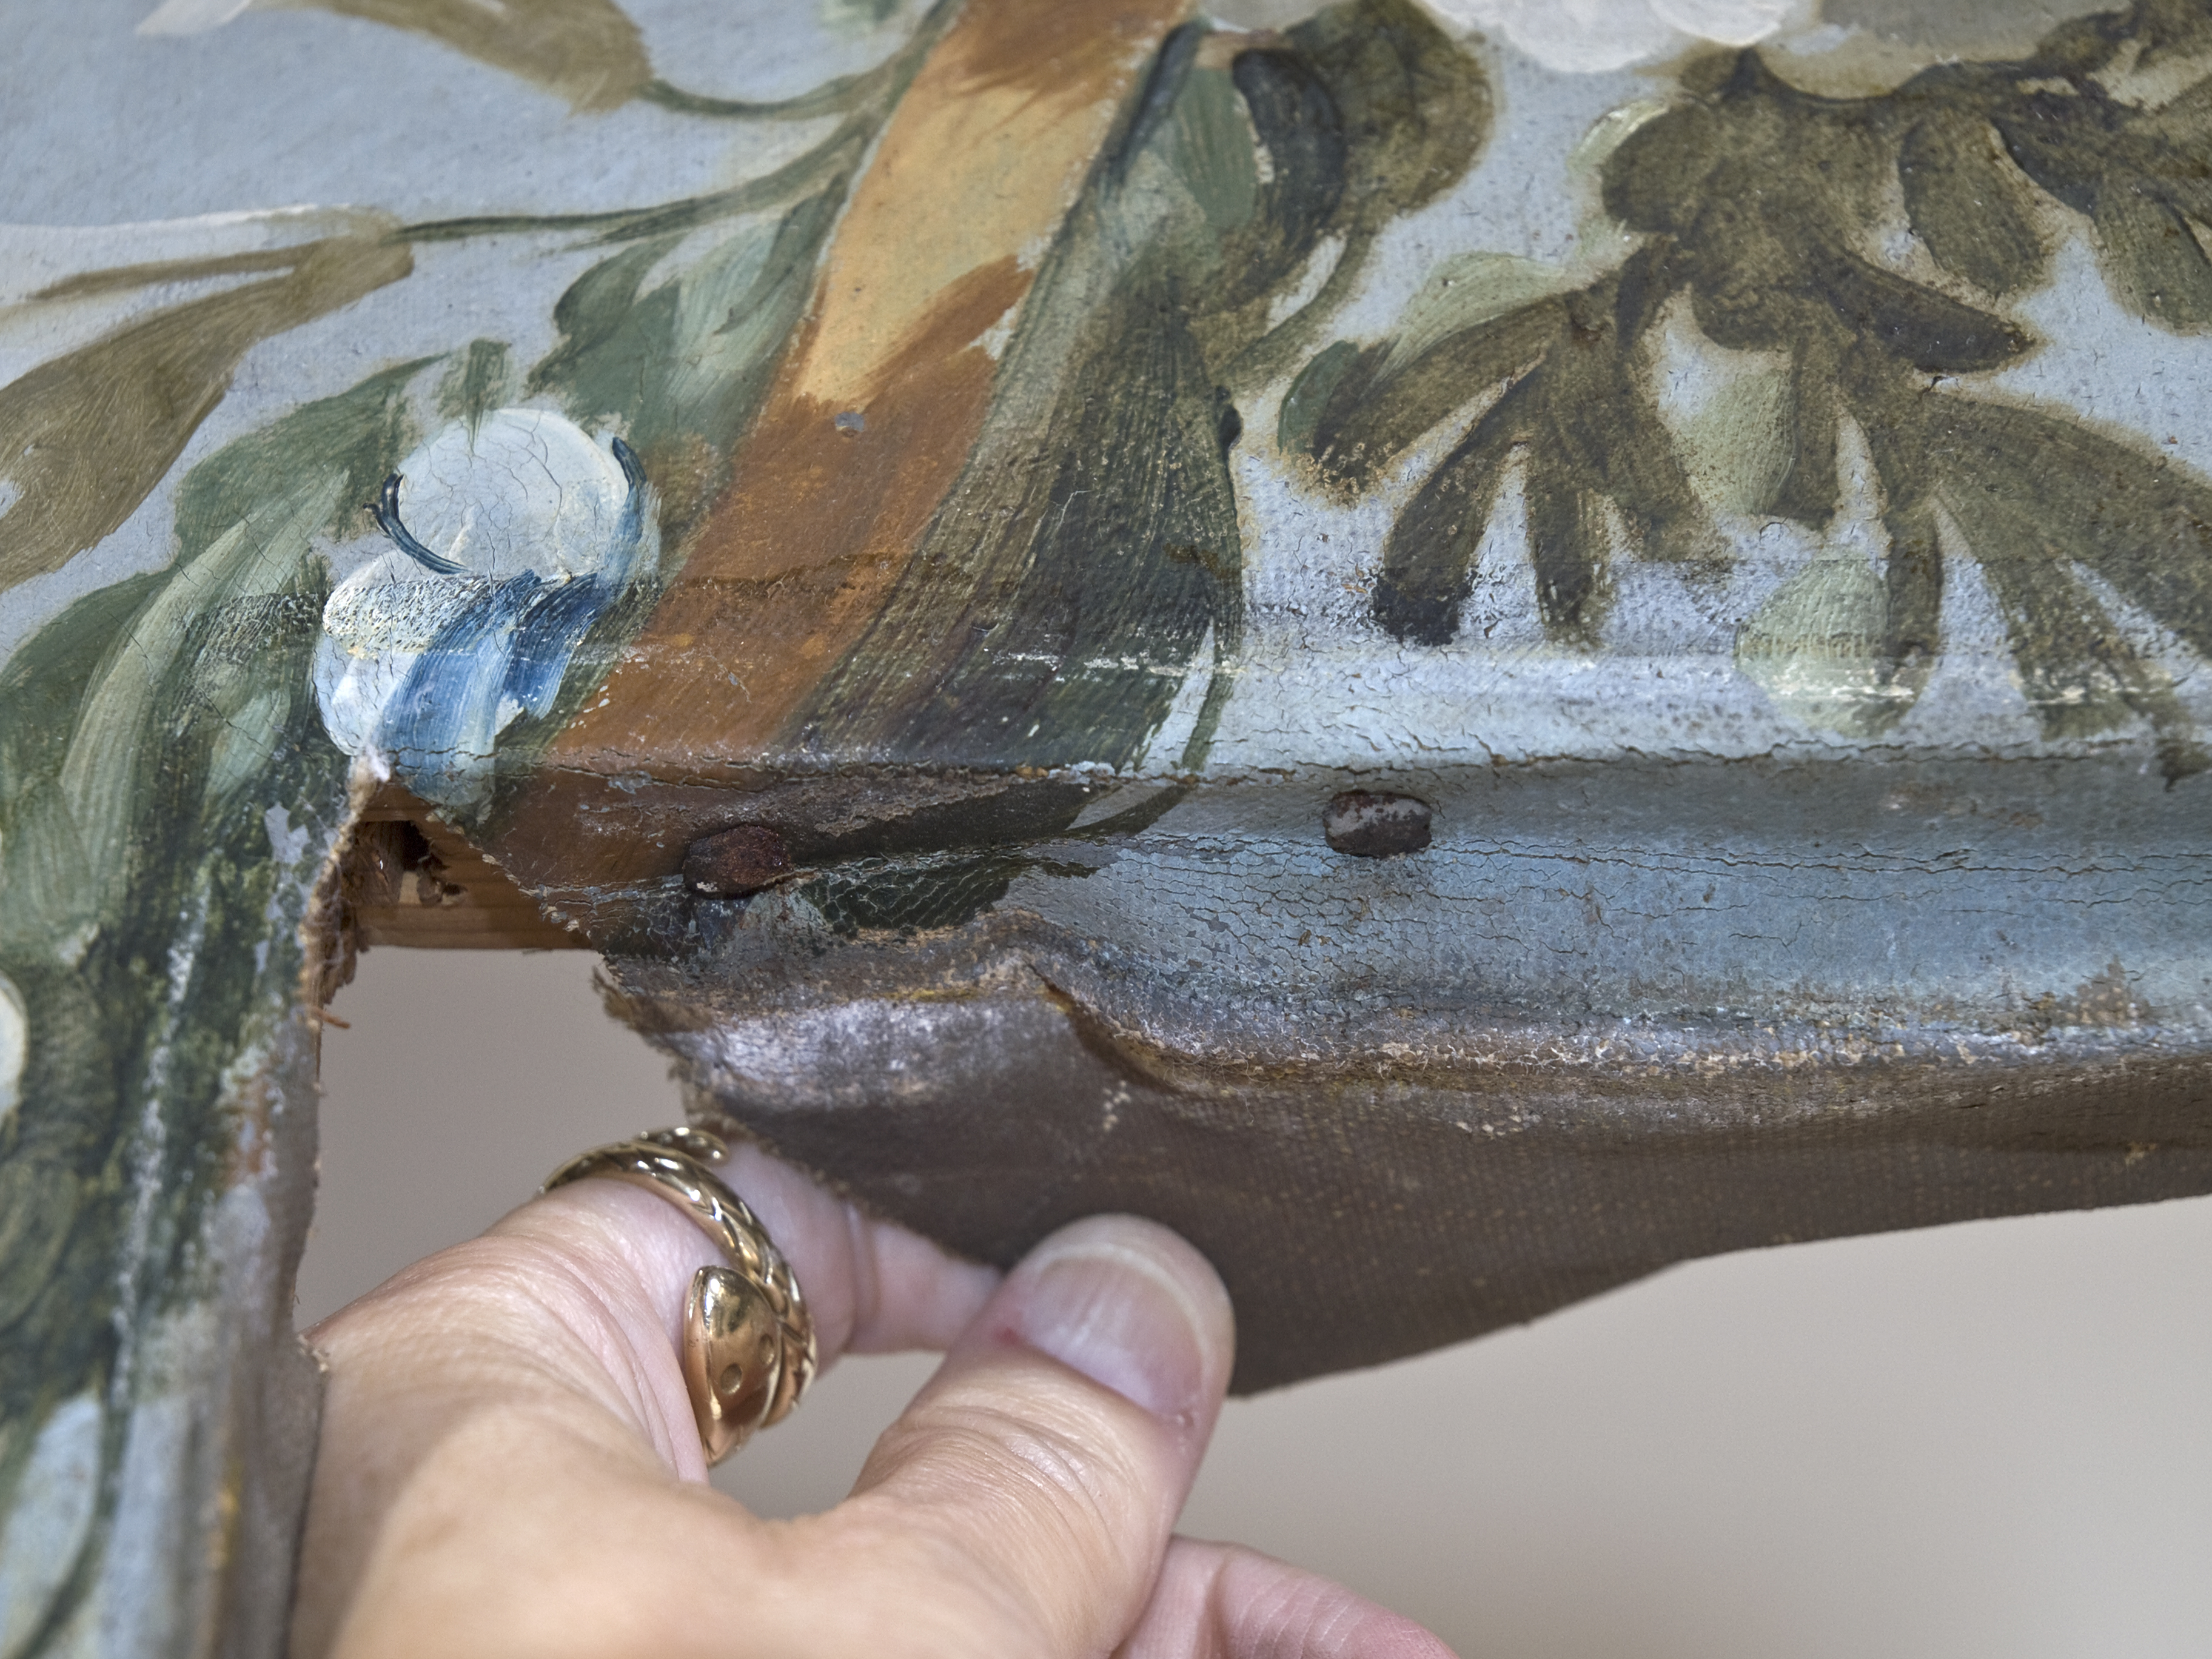
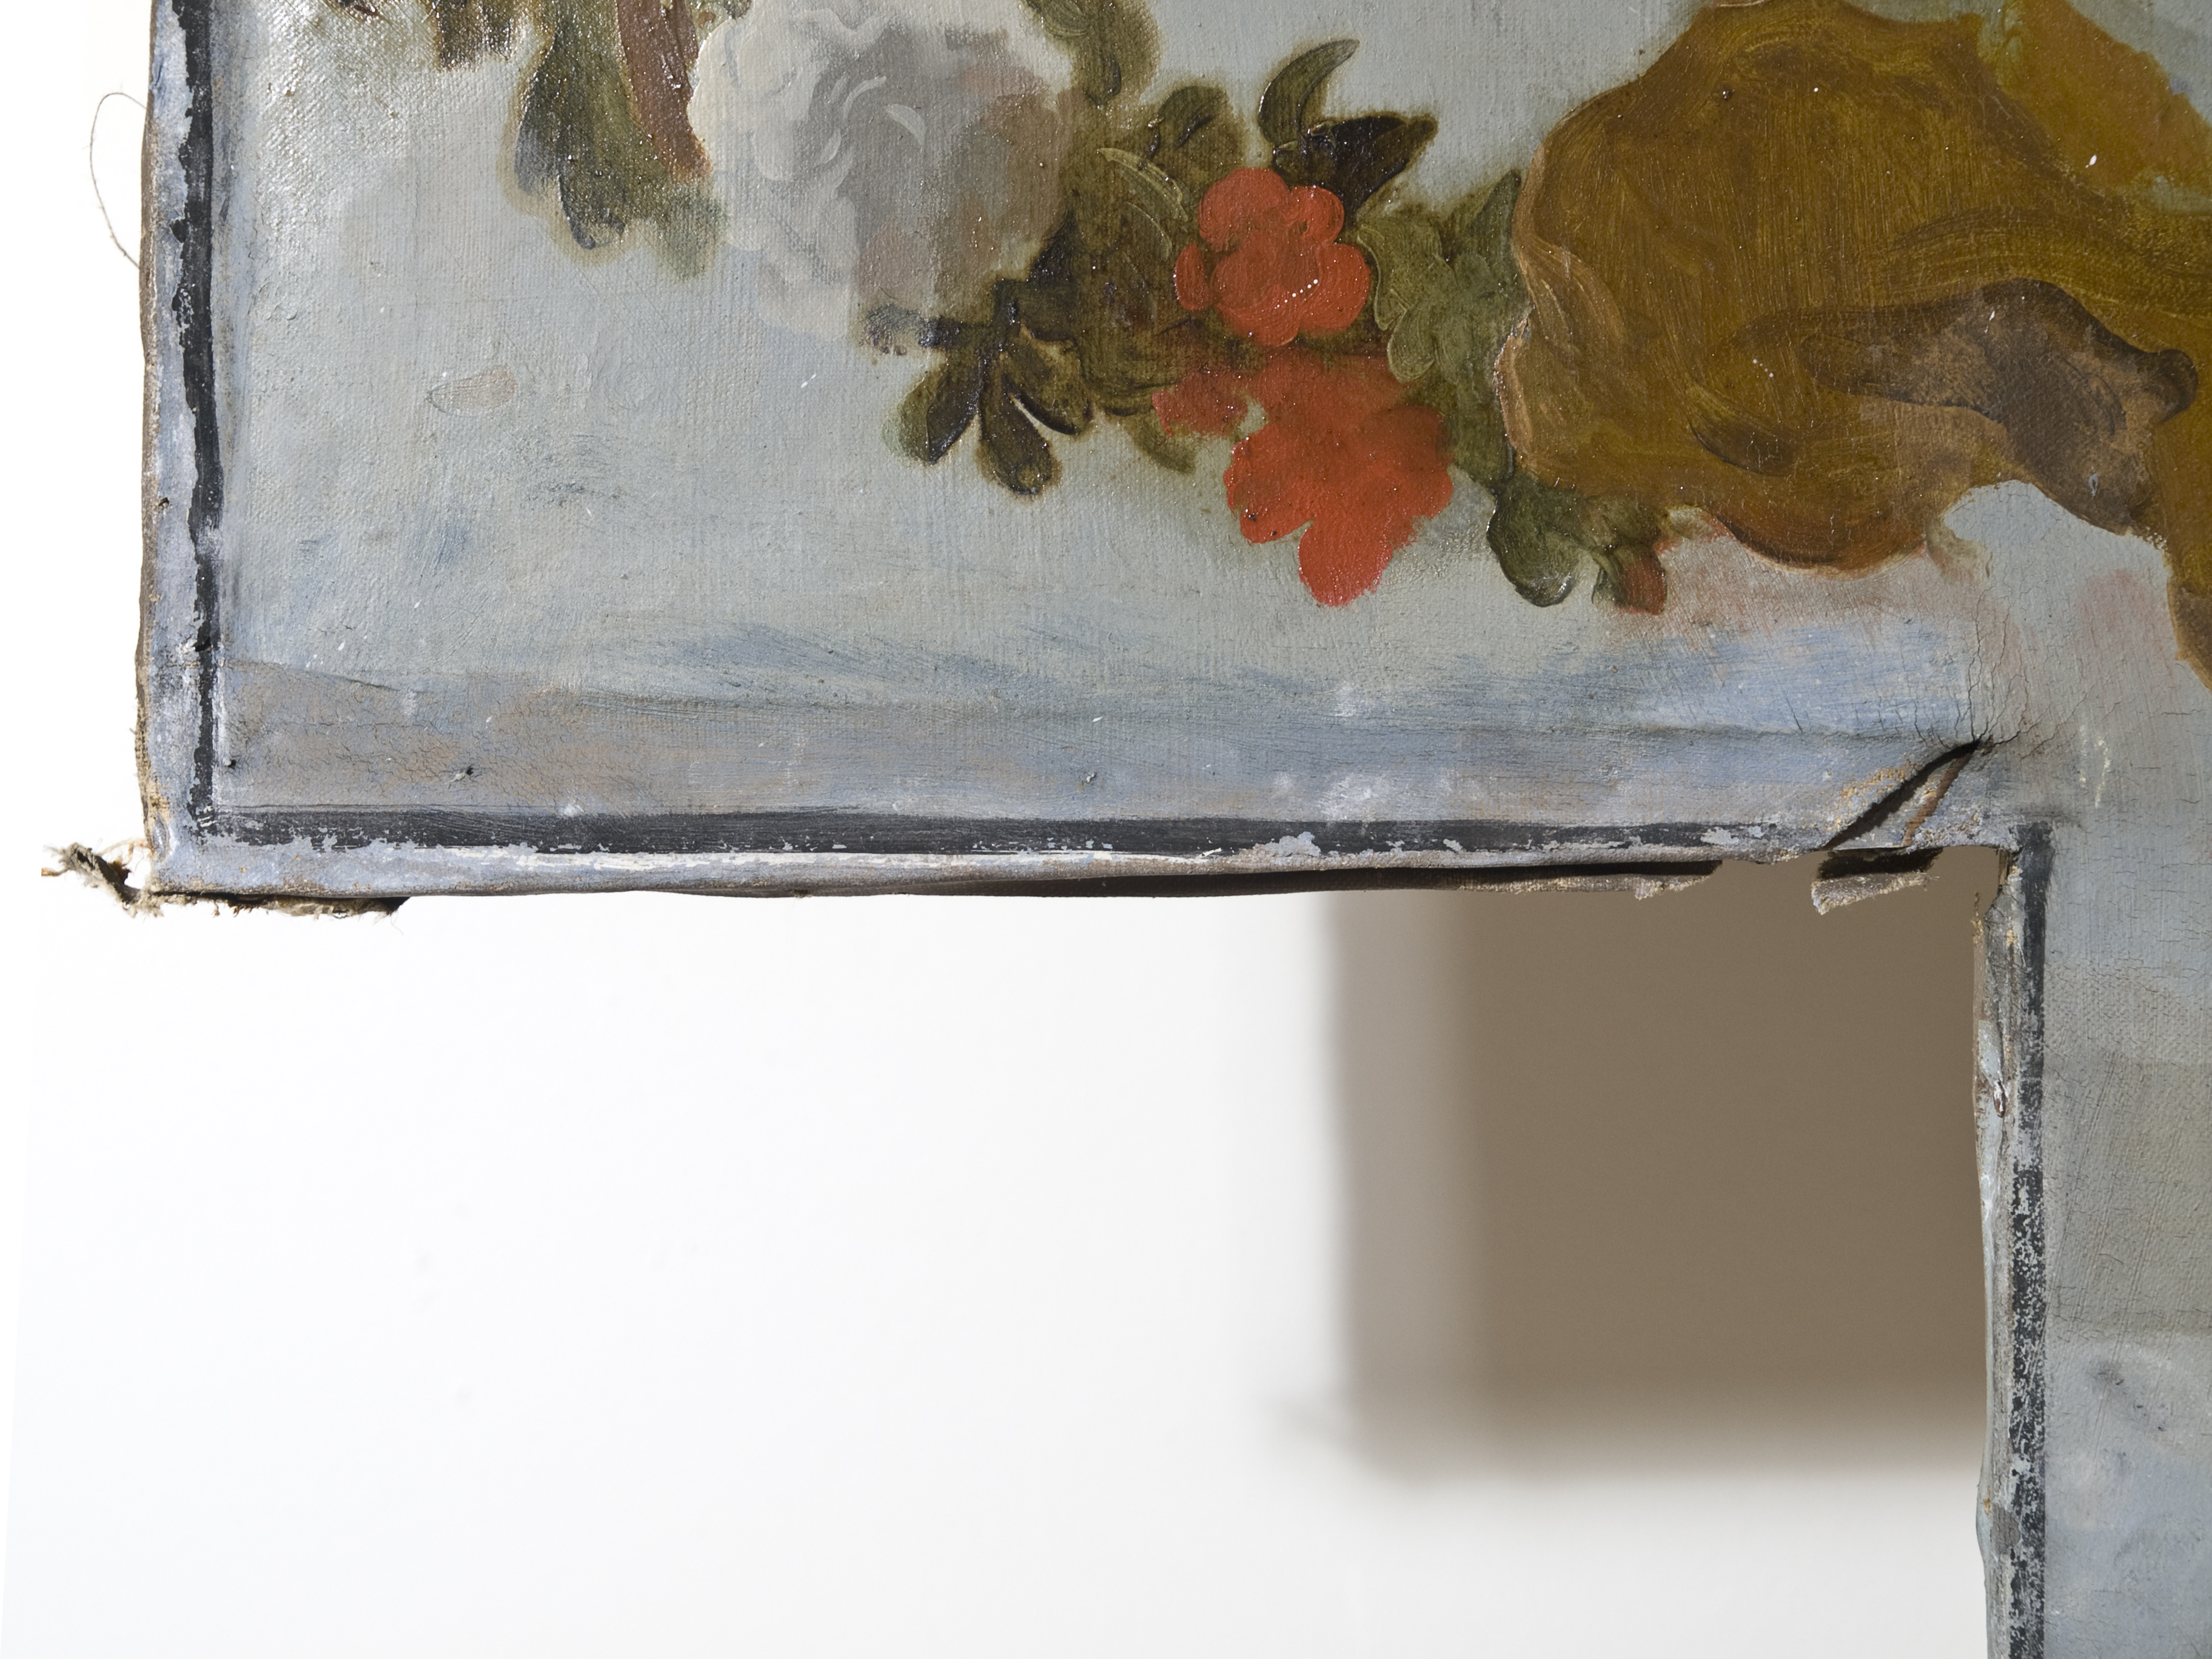
In these two photos of details one can see that the ‘wings’ of the painting have been moved a little: In the topmost photo the motif has been bent over the edge of the frame, while in the middle photo one can see that the pigment layer wasn’t extensive enough and that it was therefore necessary to add extra light blue. The correct light blue hasn’t quite been matched, however. On the back (bottom photo) it can be seen that an adjustment has been made with an extra piece of wood added to the frame.
Retouching of the Paintings
After surface dirt and old varnish had been cleaned off, the paintings were varnished, so that all the colours once more gained depth and intensity. Then retouching began. The previous, harsh cleaning had worn large parts of the pigment layer away, and the task was to retouch this damage in such a way that the damage is no longer a distraction when looking at the paintings. The retouching was done with small brushstrokes in a lighter colour, which lightened the dark patches. A brushstroke technique was used which makes the conservator’s work obvious when the painting is looked at close up, but cannot be seen from a distance.
The Warping is Corrected
The canvasses had warped along the edges. This was because several nails had rusted away and the canvas was damaged or too small, so that it was not evenly stretched across the whole picture. This meant that the damaged edges of the canvas had to be strengthened with new canvas. During treatment the pictures were not entirely removed from the frames, even though this could have made the work a lot easier. There was a desire to preserve the old and original stretching with the old nails in their original places. Not many paintings of this age are still mounted on their original frames with the original nails. Interference was therefore limited to what was absolutely necessary.
After having removed the nails which no longer held the canvas, pieces of linen canvas were glued to the edges of the painting, and then the canvas could be pulled into place on the frame and fastened again. Staples were chosen instead of nails, as this makes it easy to see what is original and what is a later repair.
Watch the video of how the edges of the canvas are secured.
The Condition of the Medallions
The medallions, which are spaced around the ceiling, are painted directly on the plaster. They are painted with tempera on a black distemper background. The black distemper had lost its ability to bind and the pigment layer had therefore to a greater or lesser extent fallen off all the paintings. Several layers of repair and repainting covered large areas which had peeled off. But the degeneration had continued and more peeling had occurred in many places. The repainting and the old repairs were not at all correct in colour and marred the paintings. The paintings feature both gilding and silver leaf. The silver leaf has decomposed, so that it is now entirely brown. This is because the leaves of silver which were used have been attacked by the plaster beneath. Originally the silver was lacquered in order to ensure that it wasn’t attacked by the oxygen in the air and thus darkened, but the chemistry of the plaster had not been considered. In several places the silver has decomposed into grey shadows all the way around the figures. This silver damage is irreversible.
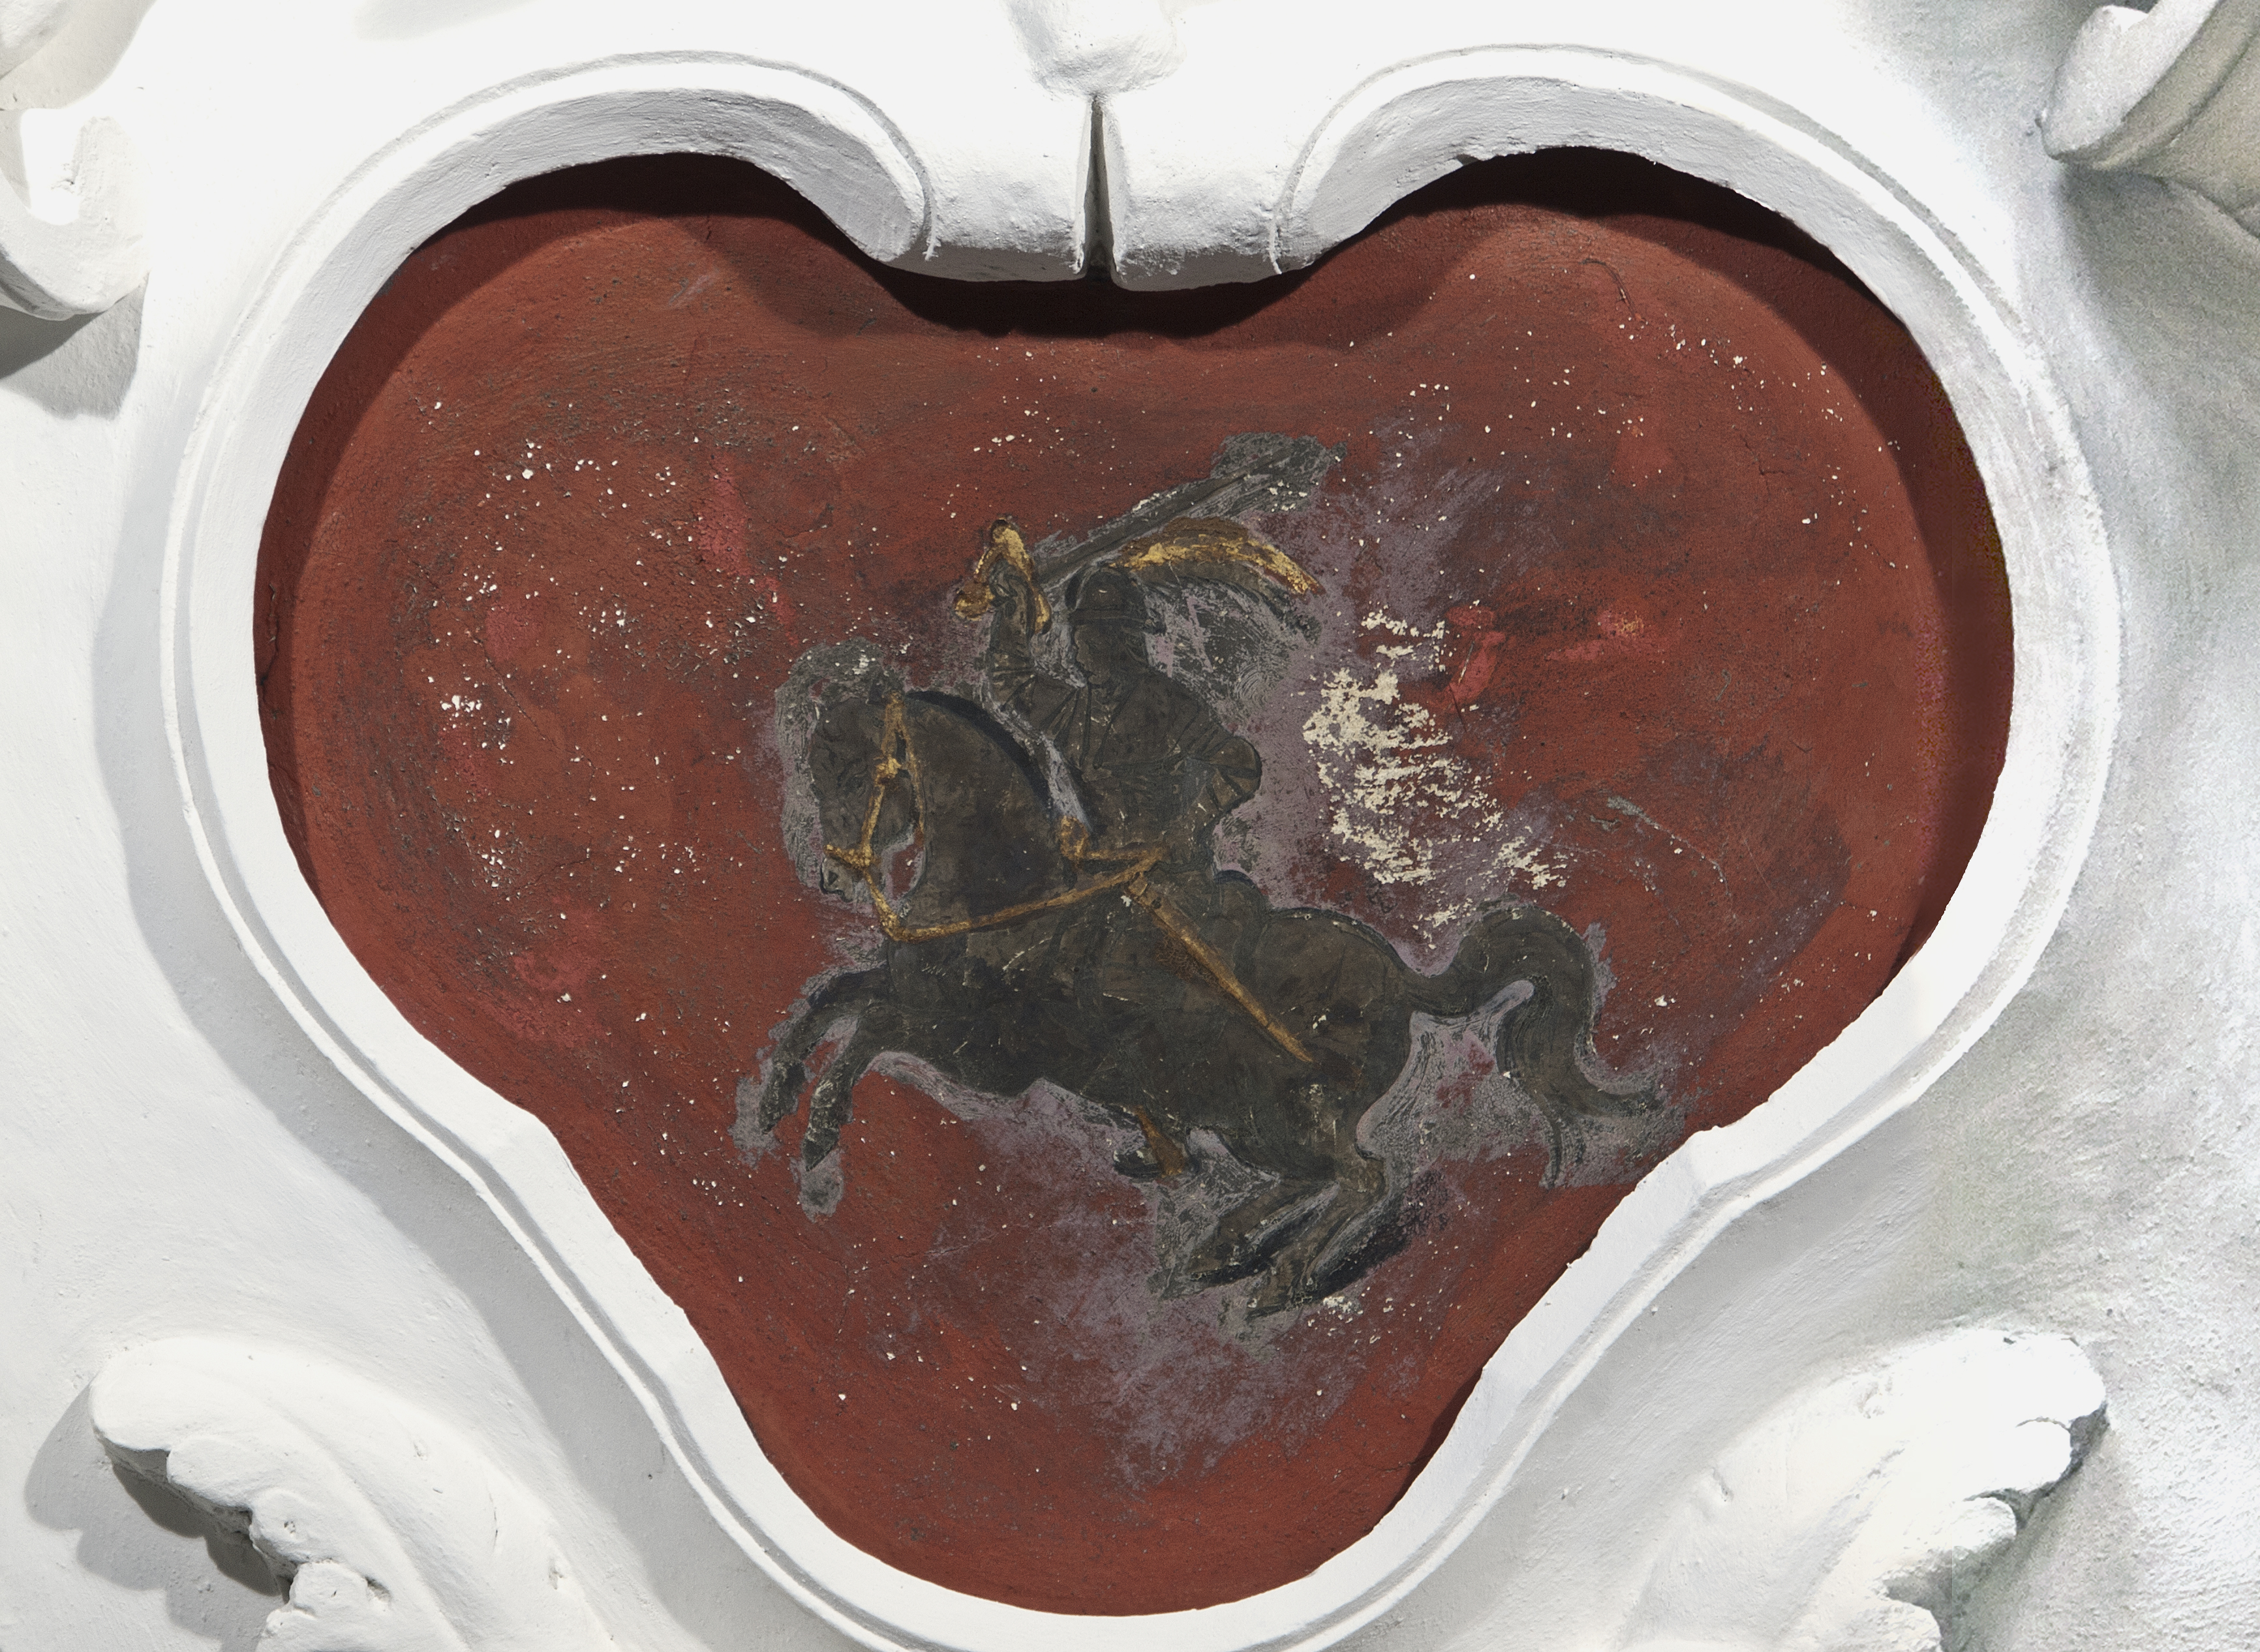
The medallion with the Knight of Dithmarschen. The knight is in silver leaf and originally stood out in shining silver with gold details. But the silver has decomposed and is now entirely brown. The red ground has been completely repainted, because the original red pigment had peeled a lot. What remains of the red pigment is very loosely attached to the plaster base.
The Treatment of the Medallion
The conservators Anne Brøndum Torp, Lin Spåbæk, and Berit Møller climbed up a scaffold to work on the 15 medallions which are spaced around the stucco ceiling in The Marble Chamber. The treatment of the medallions began with consolidation of the pigment layer. The brittle, fragile pigment layer was glued down to the plaster base. A number of different glues were used, as the medallion’s pigment layers reacted to the glue in different ways. Once the peeling pigment had been glued down the surface was cleaned of excess glue, repainting and retouching.
After conservation some filling in was carried out on the medallions in the window niches, while it wasn’t necessary to fill in the other medallions. All damage was retouched with water based pigments. All damage was covered – including the grey shadows of decomposed silver which were present on several of the medallions, and the pigment layers which had been lost were replaced. The retouching was done with the same brush technique as on the oil paintings.
Finally the silver leafed and lacquered figures were given a new, thin layer of lacquer for protection.
Watch the video of the conservators securing and cleaning the pigment layer on the ceiling medallions.
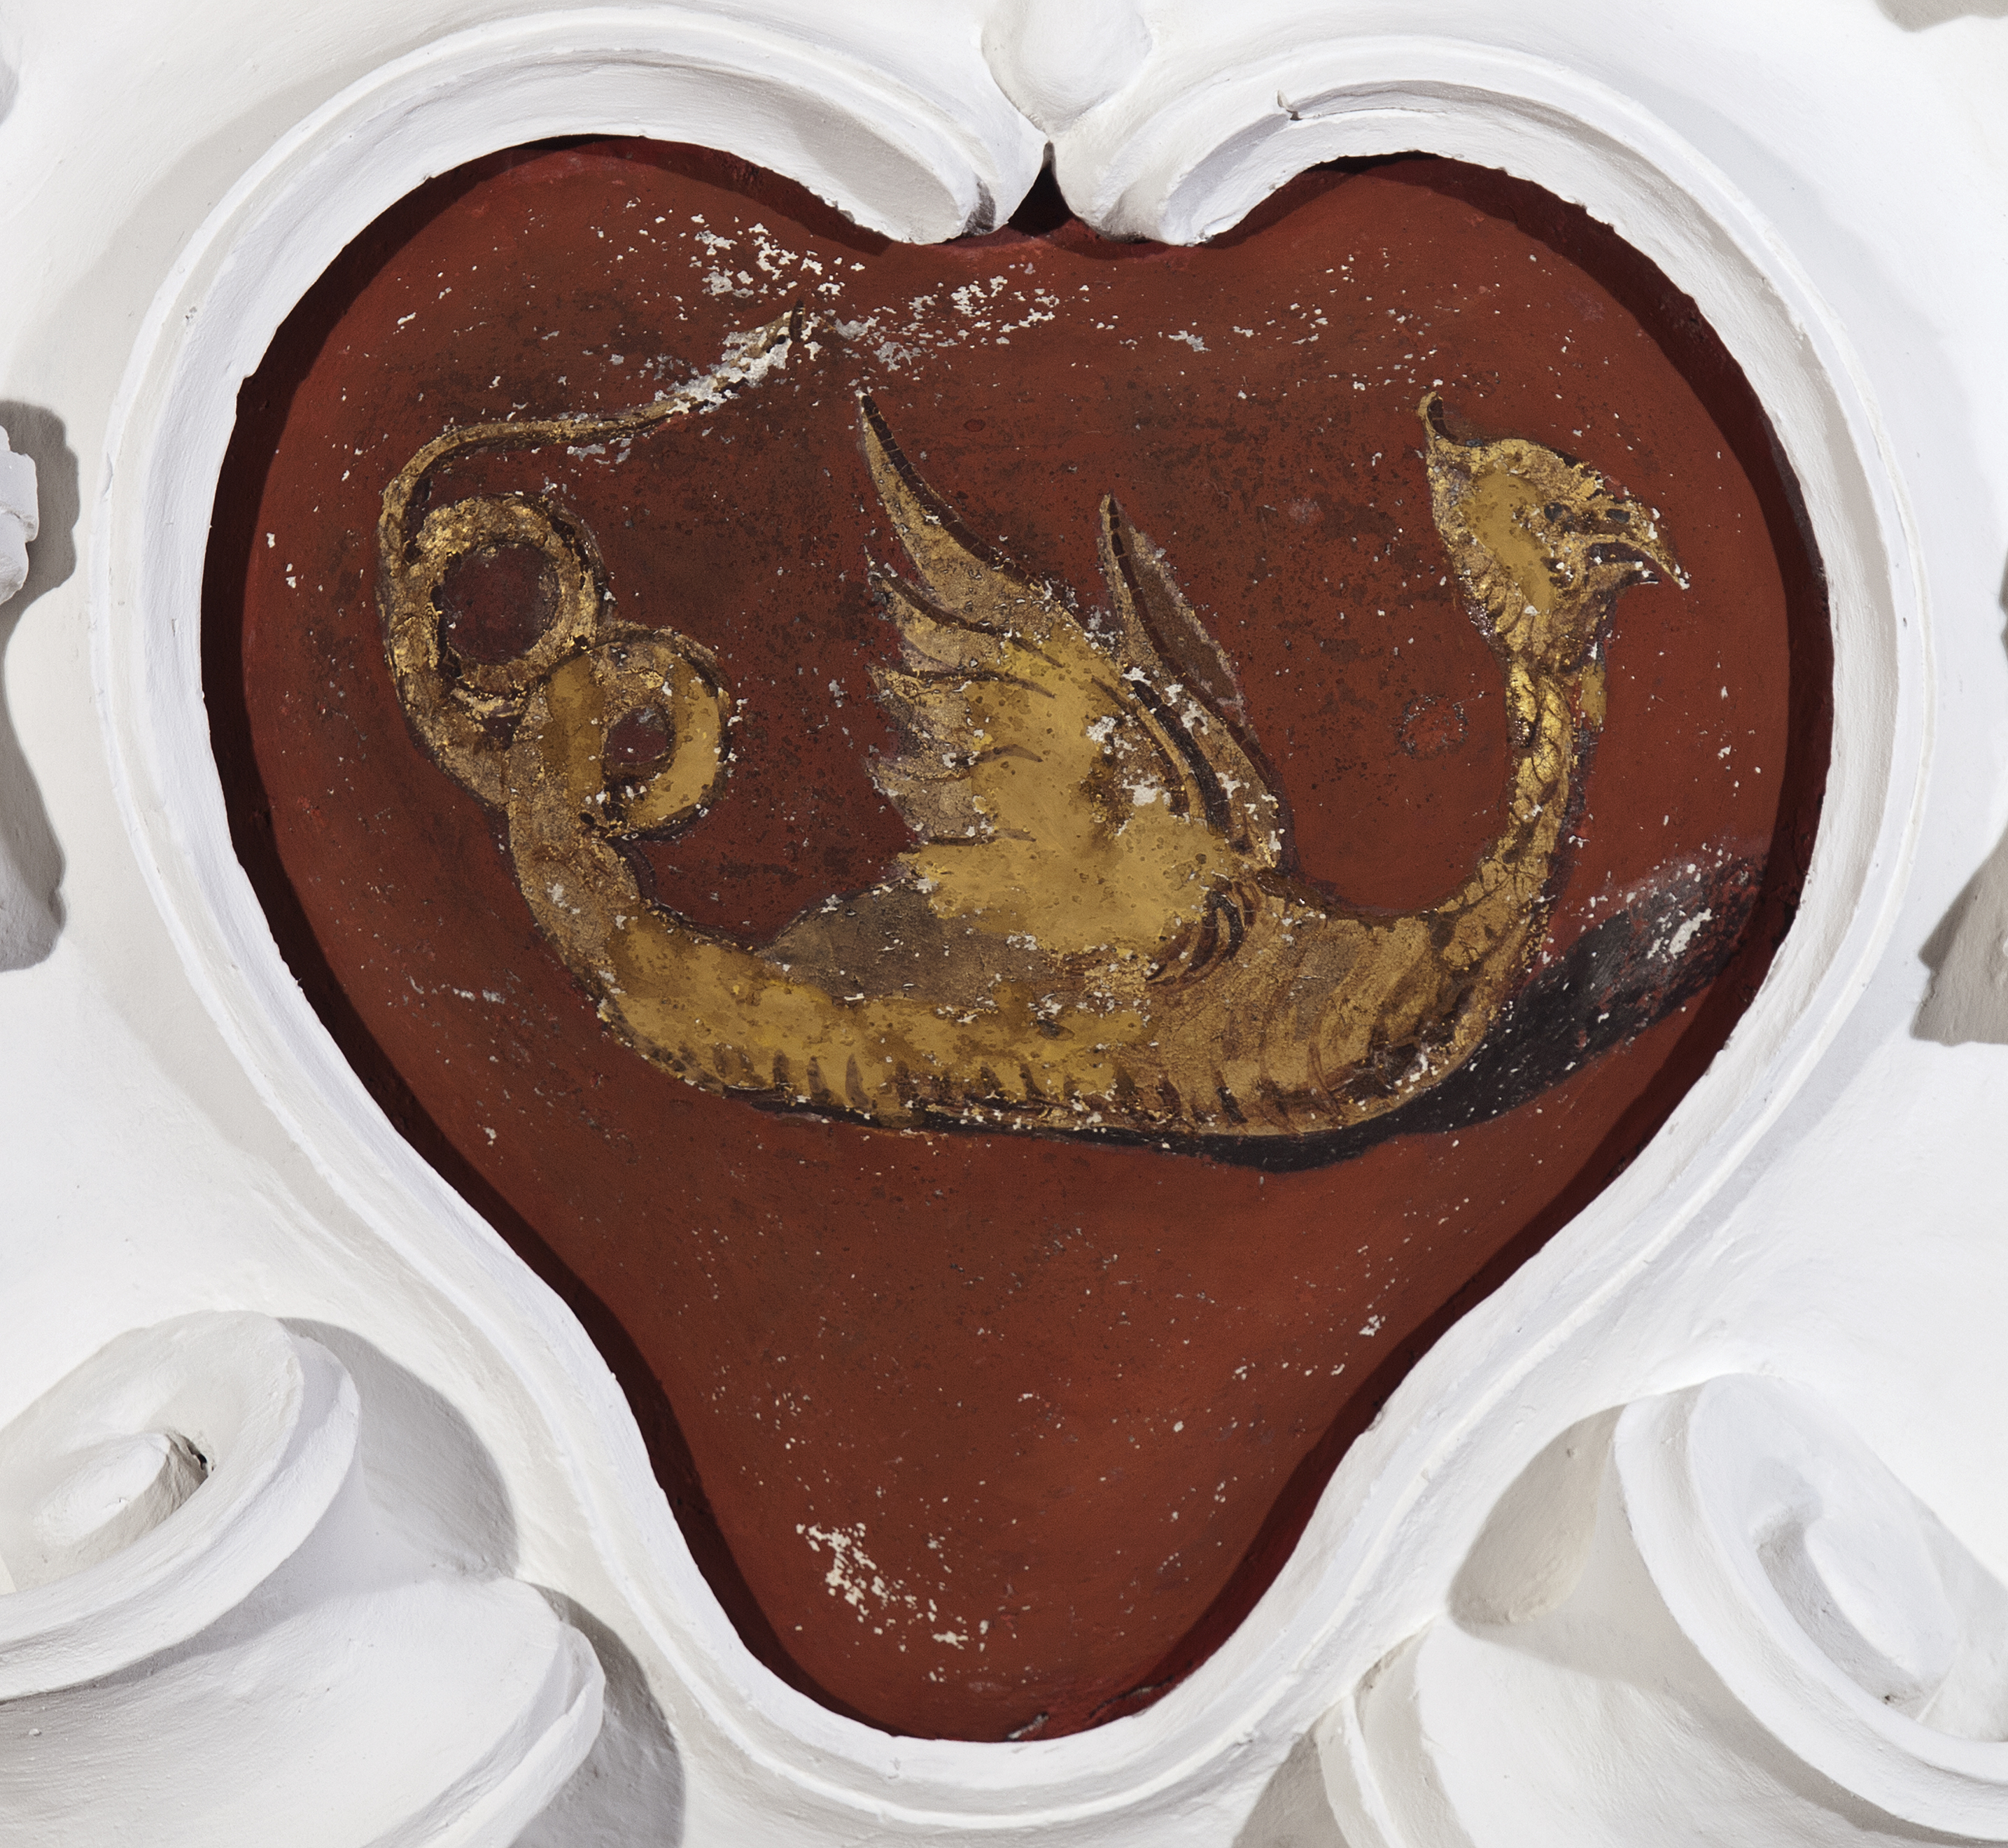
The medallion with the Lindworm of the Wends before and after conservation.
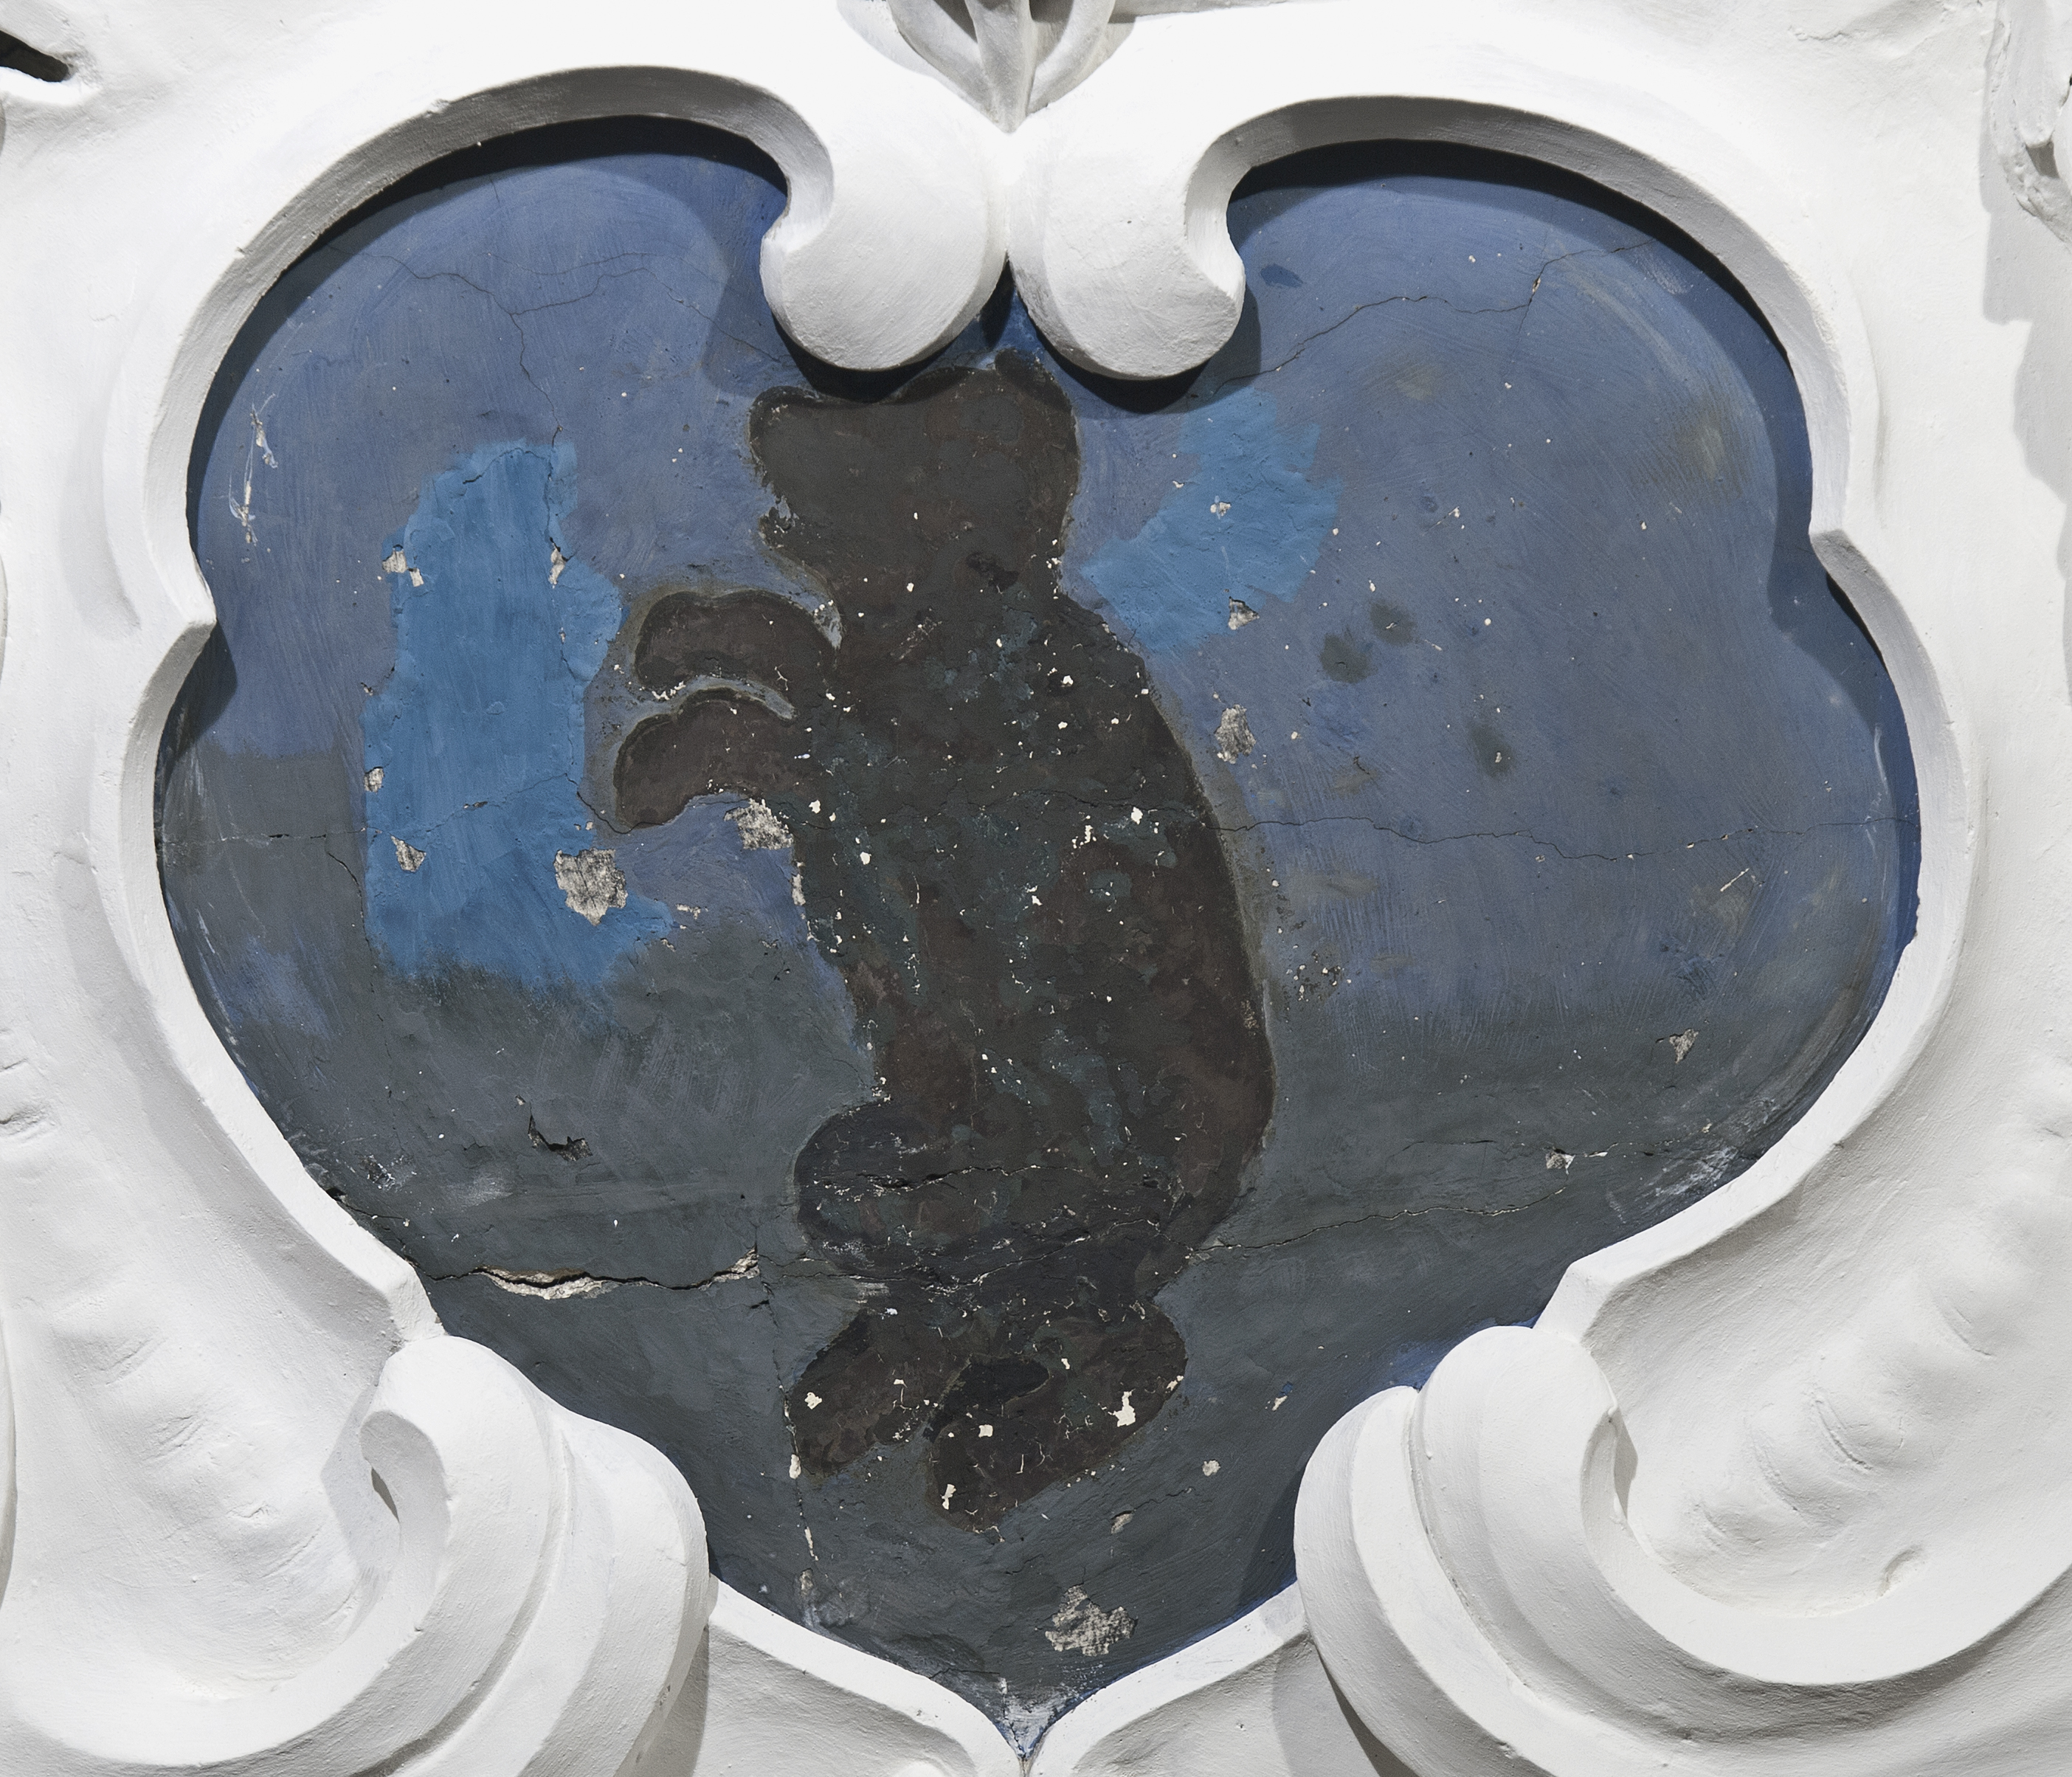
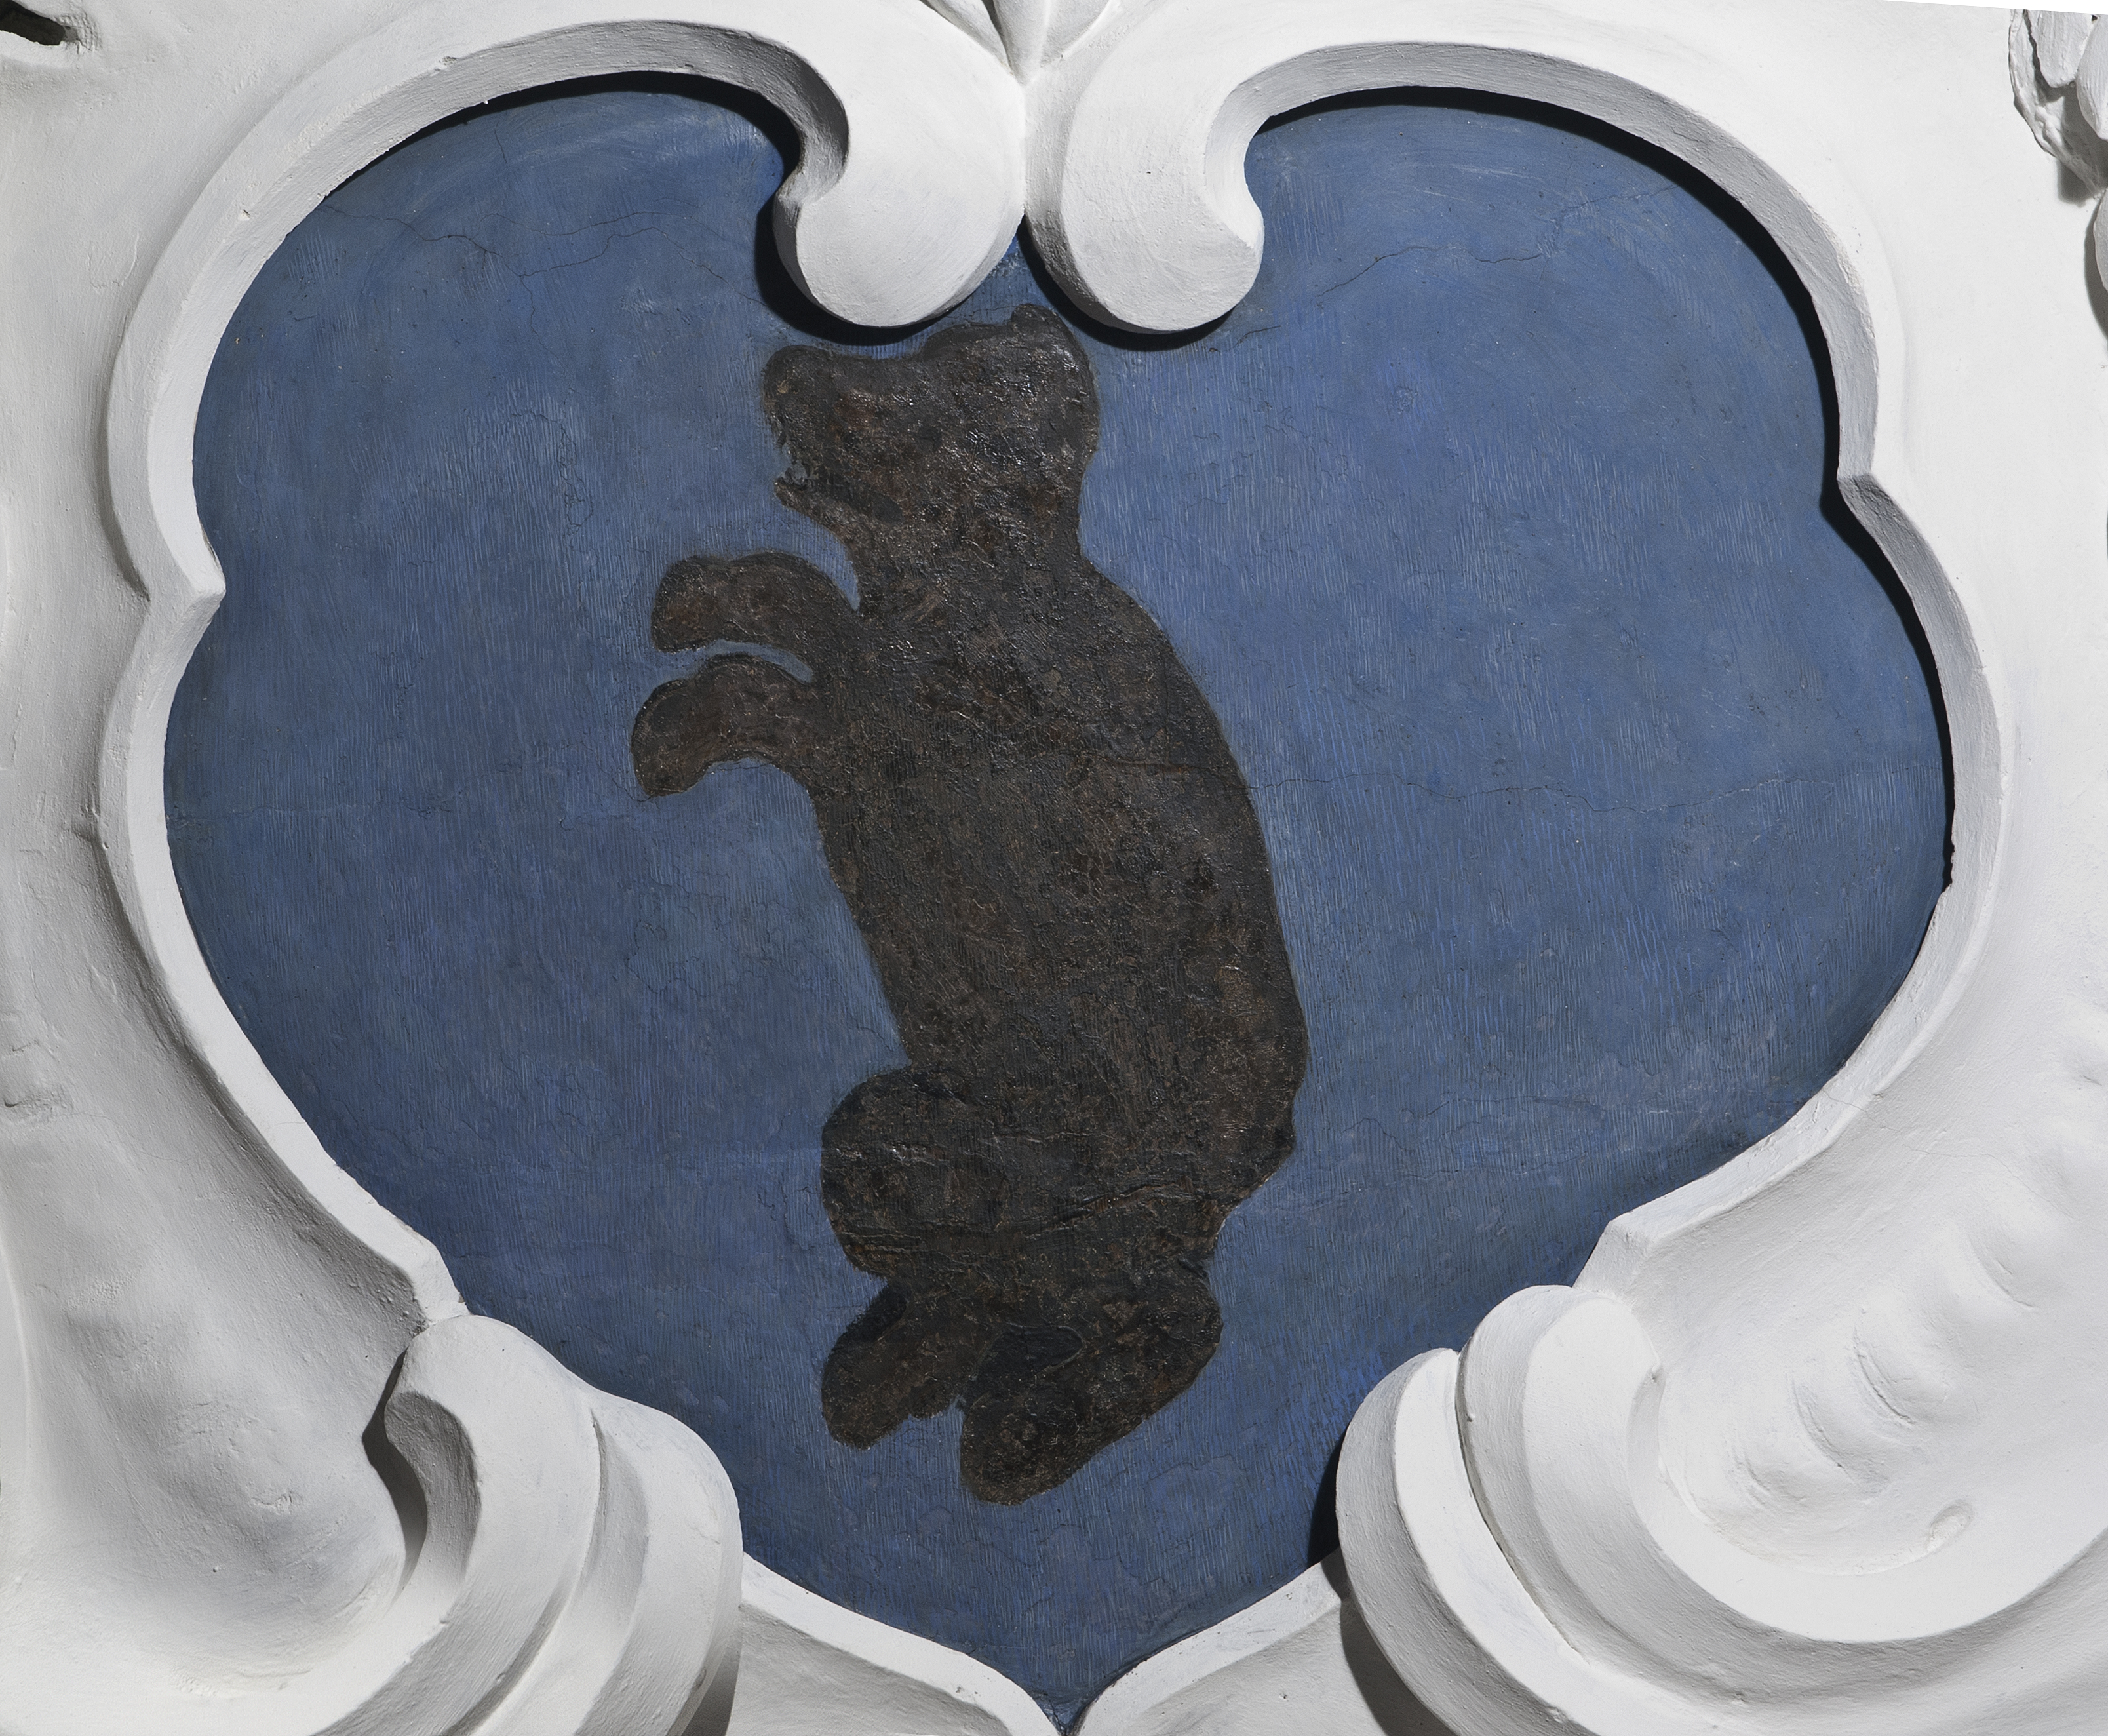
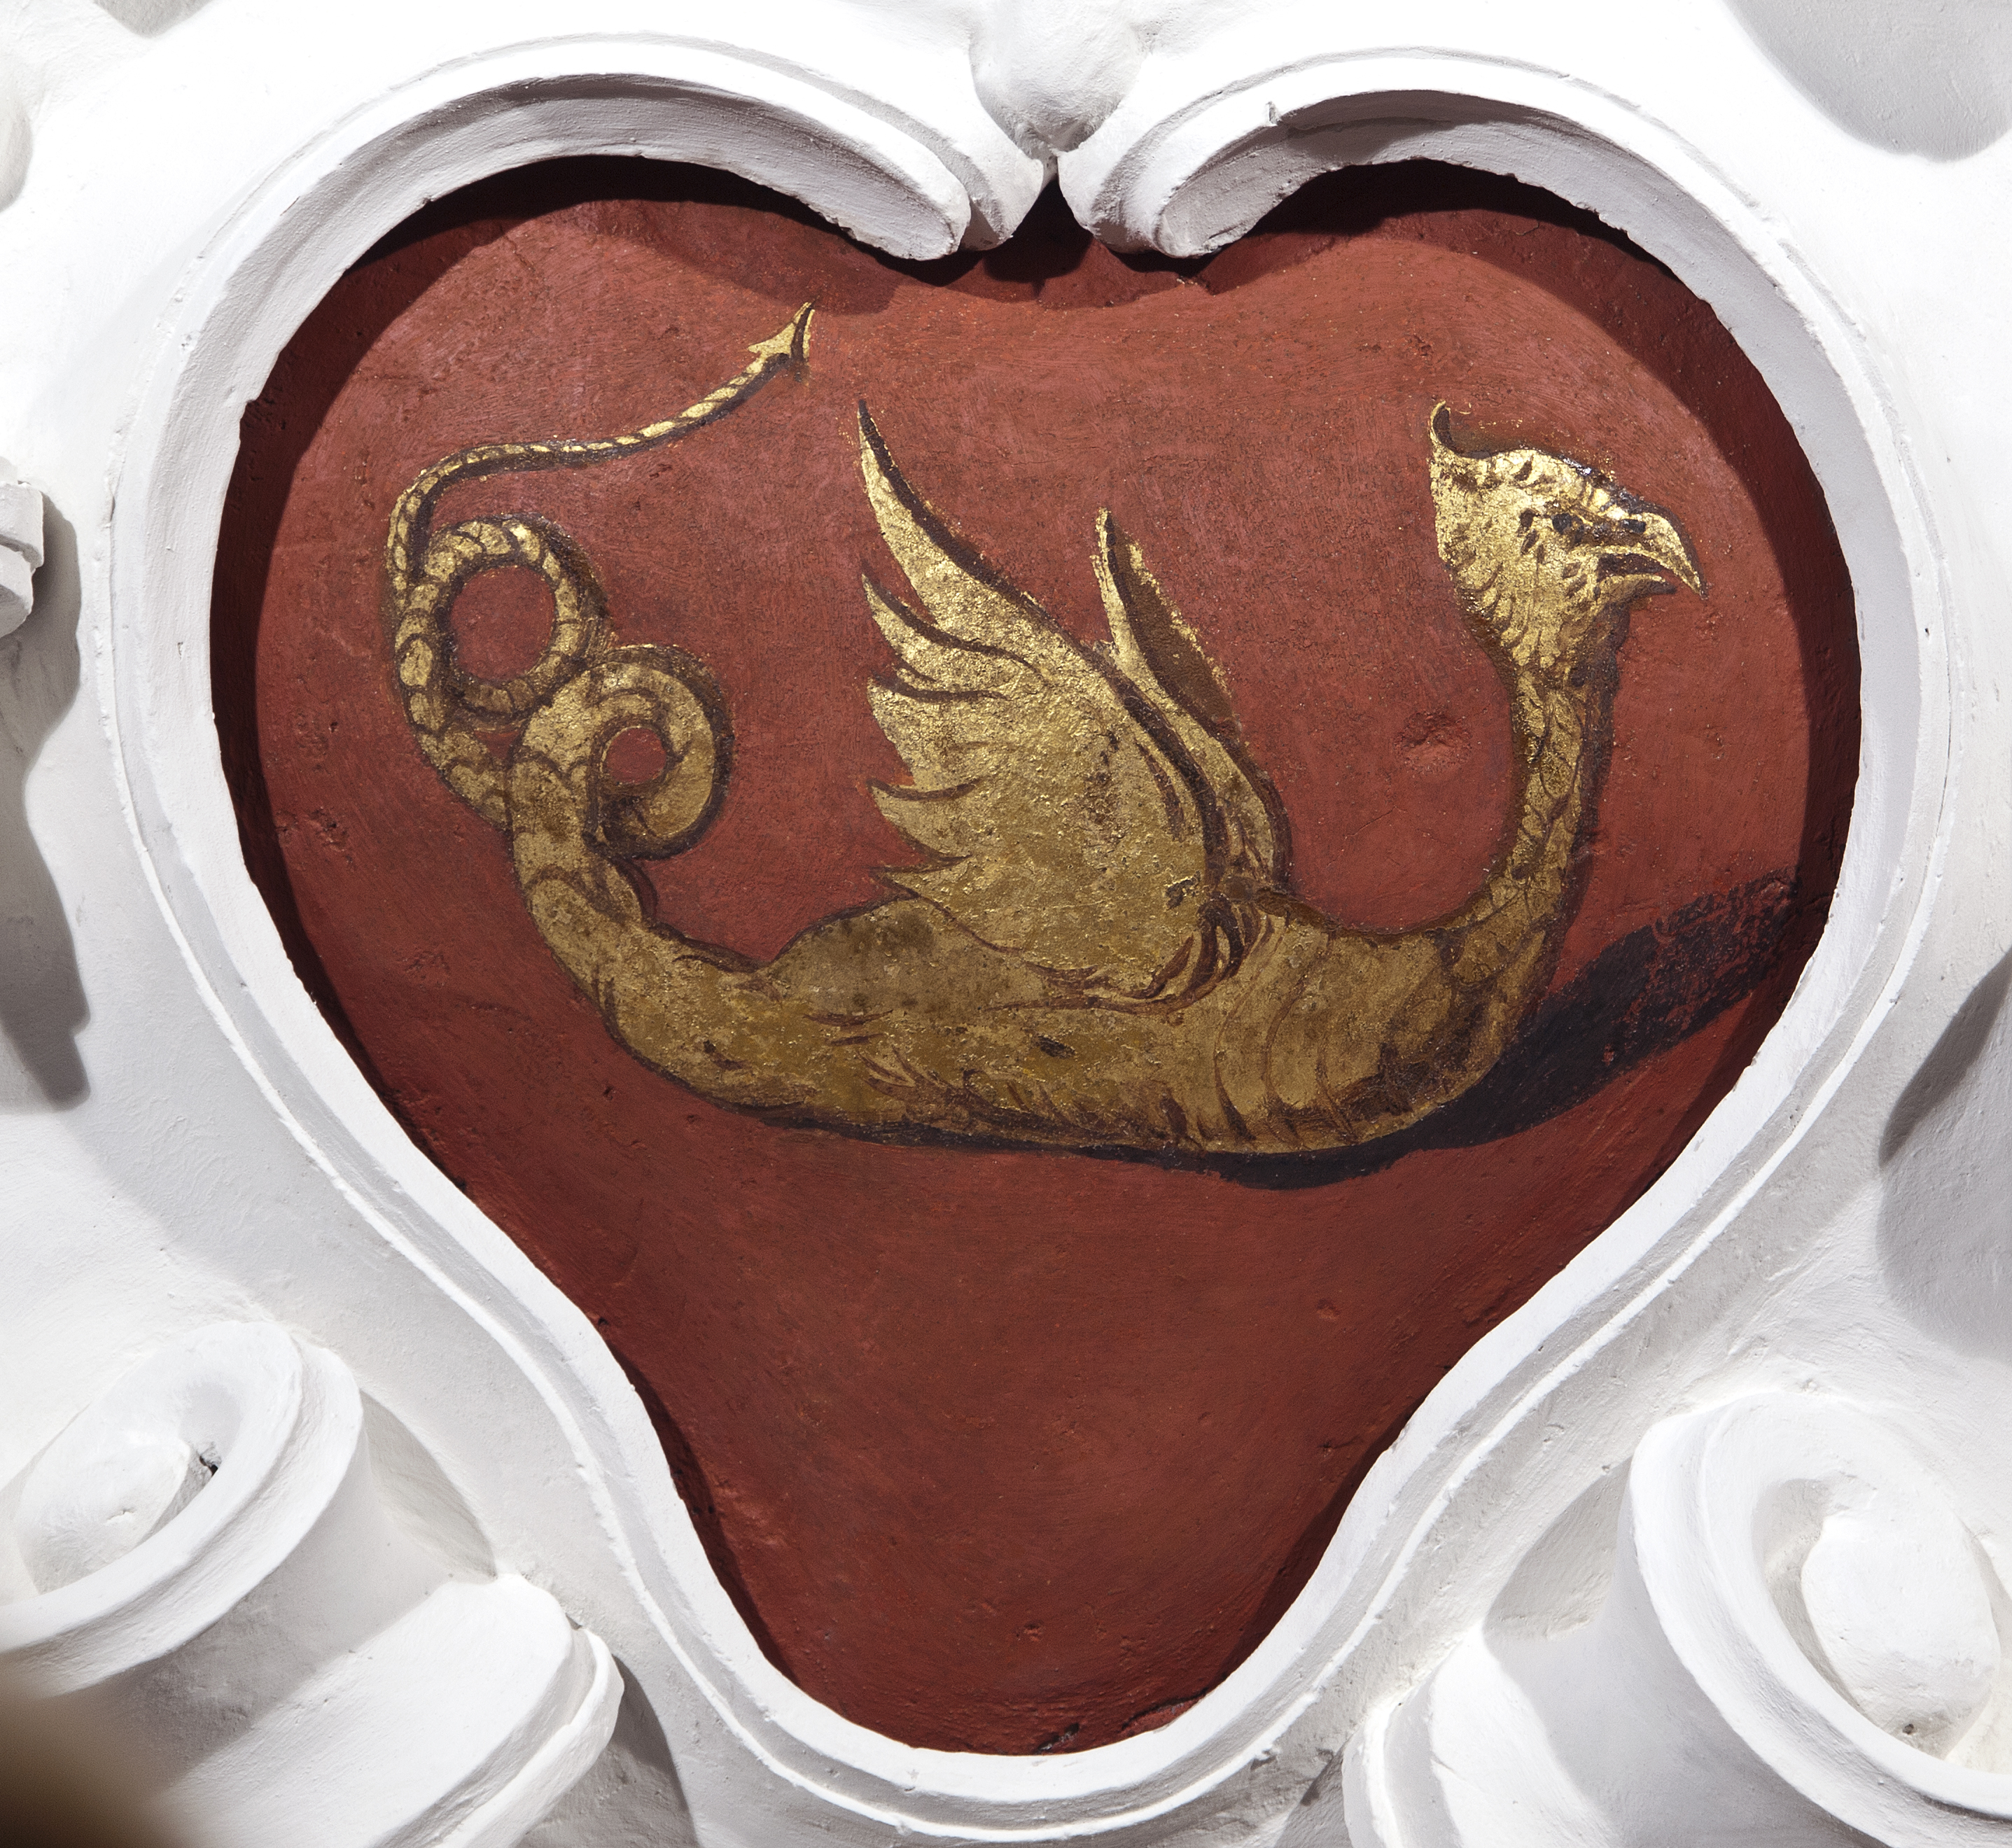
The medallion with the Polar Bear of Greenland. This figure was originally also in silver leaf and was shiny, but today the silver has turned Brown.
The Condition of the Woodwork
The marbling in enamel on the doors and in the corridors had peeled a lot and the pigment had fallen off entirely in many places. Old retouching and repainting had grown dark, yellow, and had a matt surface. But beneath all the dreary repainting the very beautiful original marbling could still be seen.

The marbled doors were very dreary to look at before treatment. The pigment layers were peeling off and the colours marred by repainting and dirt.
The Treatment of the Woodwork
The treatment of the woodwork’s beautiful marbling was carried out in two places, namely in the conservation studio, to which the doors had been brought, and in The Marble Chamber’s two small corridors. Here there were marbled walls and ceilings which could not be removed. The supporting underlay – the wood – was in a good condition, but several of the old glued joints in the doors had split open, and the planks in the mirrors had moved away from each other. But because of the construction of the doors it was nevertheless possible to push together and glue the planks again.
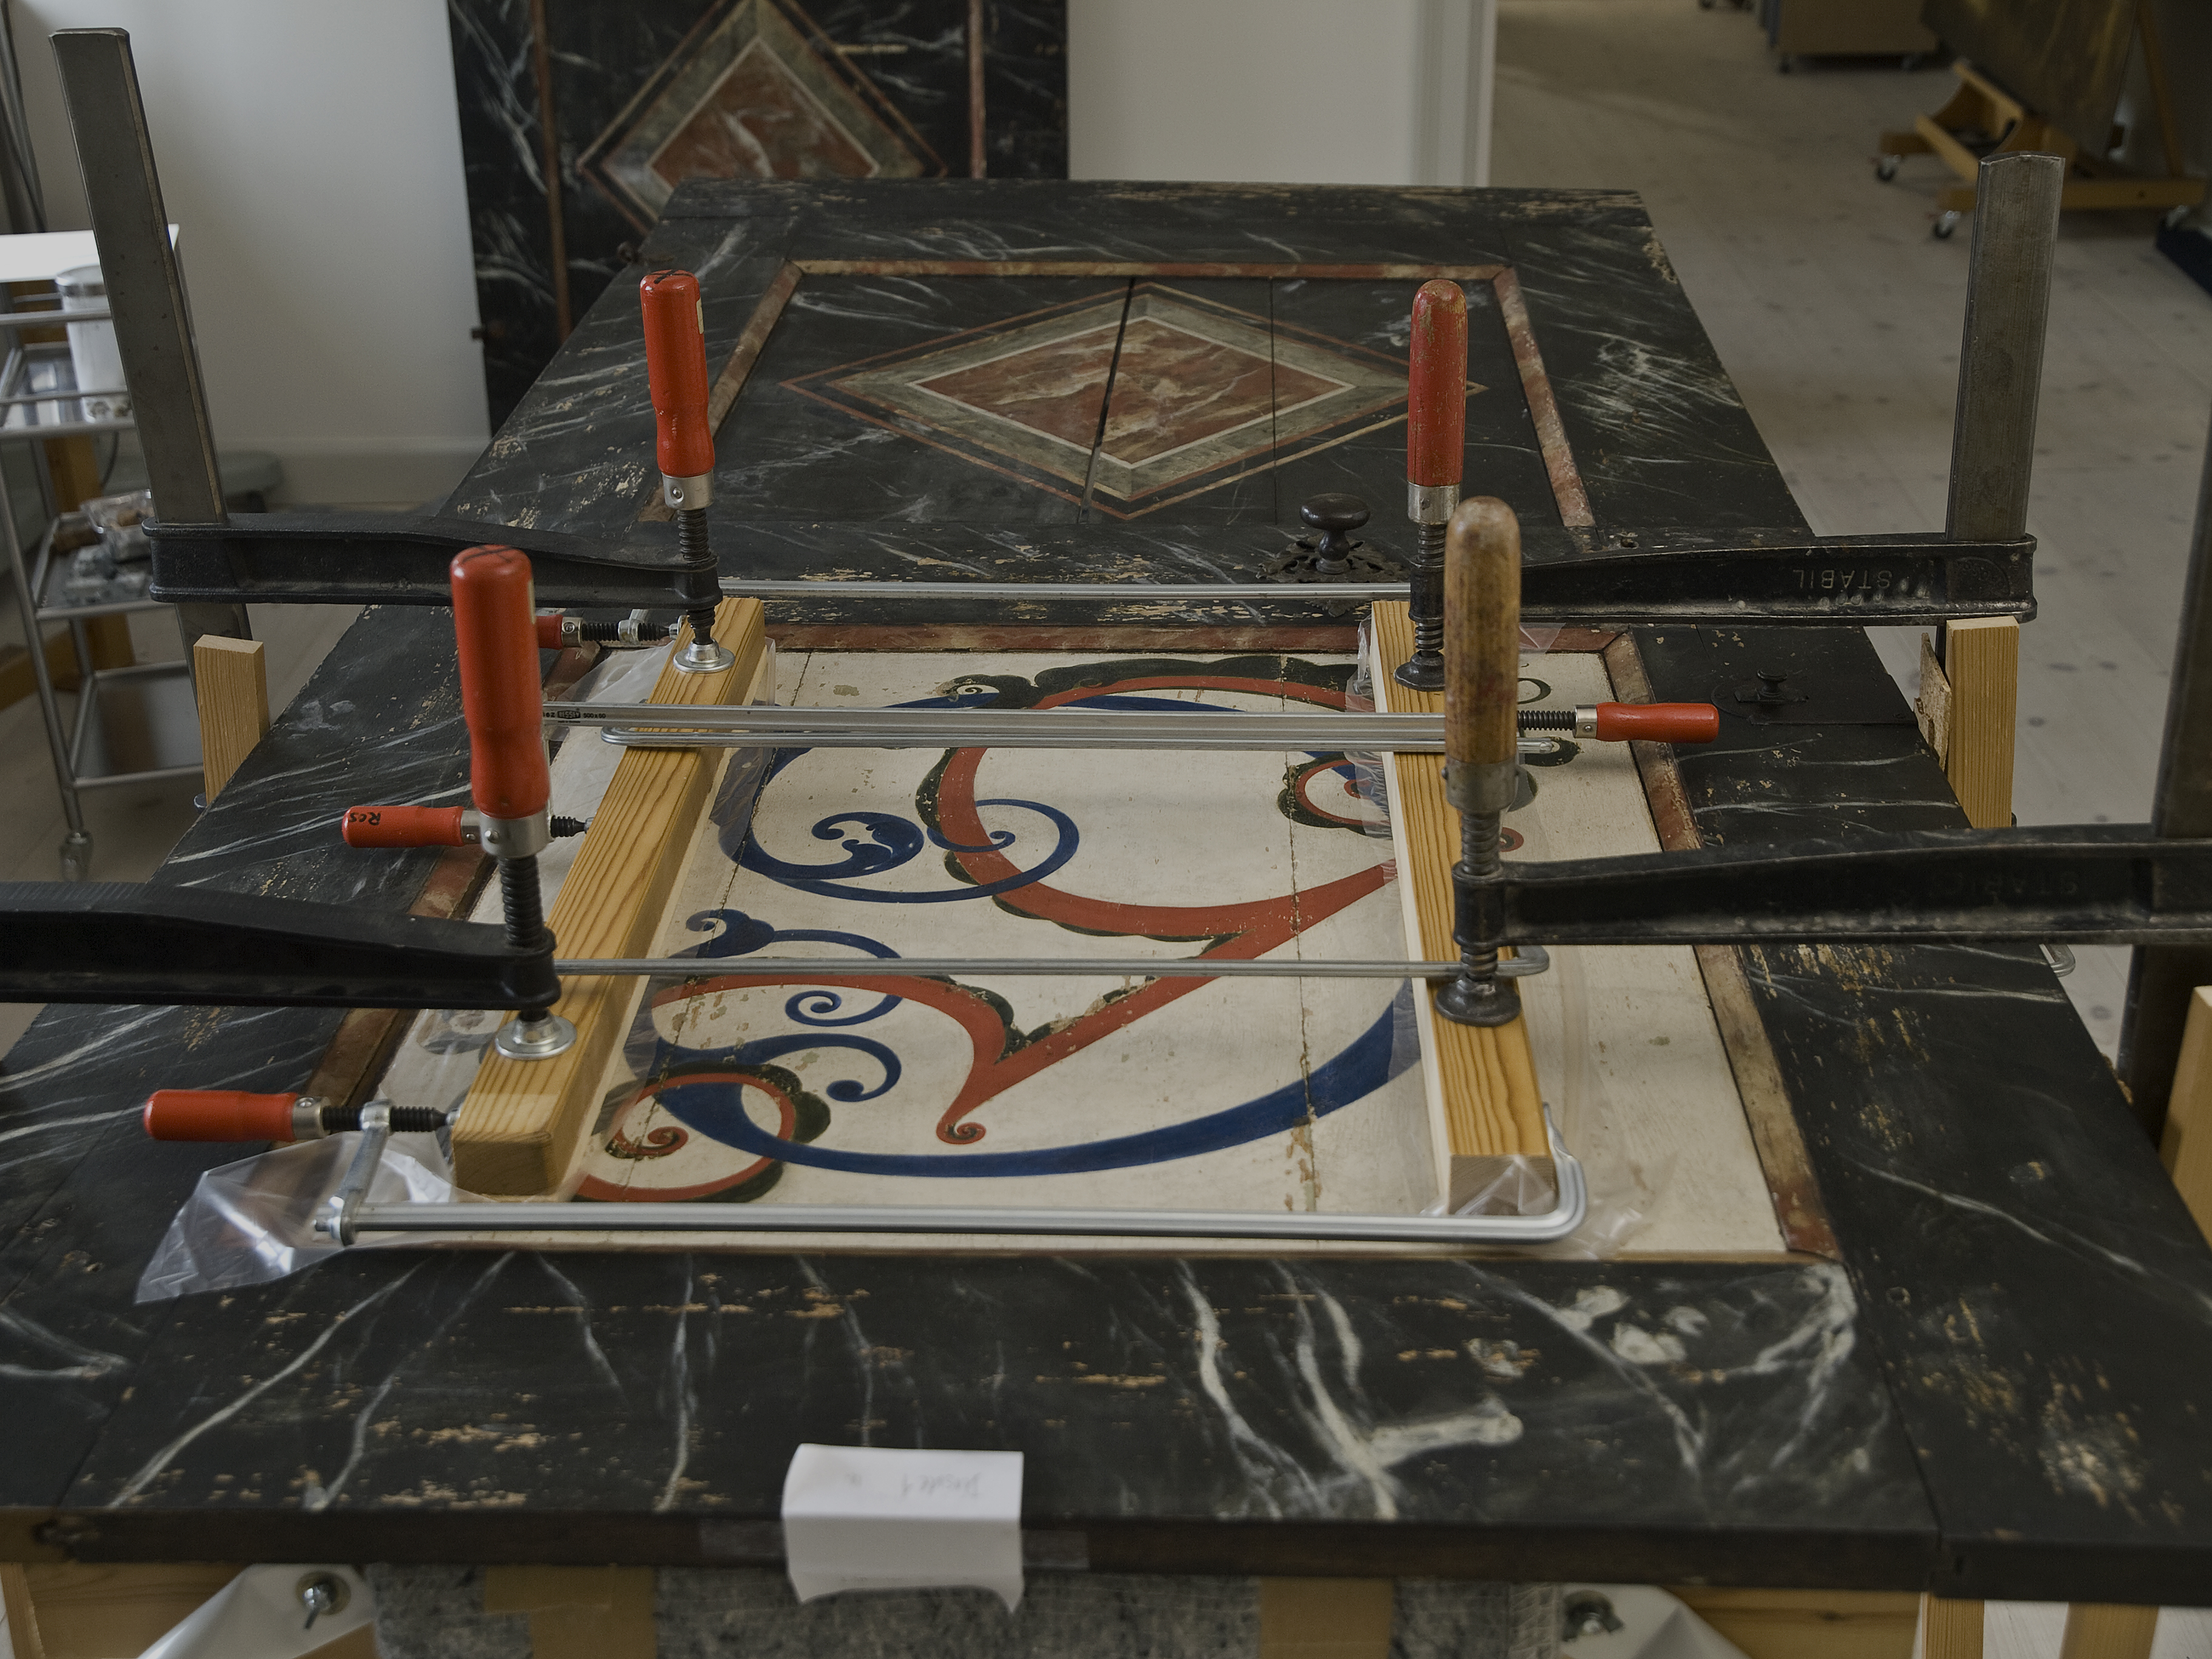
The old glued joints had split, and after being glued again the planks were pushed together, after which the glue dried under pressure.
The pigment layer on the doors was in large part well preserved, while in other places it was very damaged and had to be secured.
Each flake of pigment was glued to the wood underlay. Fish glue (from a sturgeon) was used because it is thin and seeps in under the pigment layer very well. Once the peeling pigment had been pressed down, the surface was cleaned of excess glue. Much of the ugly retouching and repainting was removed during this cleaning process.
Watch the video of the paintings conservators securing and cleaning pigment layers on the marbled doors.
After the securing and cleaning, the remaining repainting which was not removed together with the glue was cleaned away. In a few places the original veining couldn’t be removed, so it had to be left in place. The aim was for the doors to look as original as possible, at the same time as the later additions were preserved to a certain degree. For example, the pigment layers on some of the additional pieces at the bottom of the doors were preserved and restored even though they were later additions. The peeled layers were filled in with a toned chalk ground. The original lacquer had become very matt, but had originally been glossy. The lacquer was therefore regenerated with a solvent, so that it became glossy once more and the colours in the marbling stood out more. After the filling in and insulation of the filler, the doors were retouched. The hinges were cleaned.
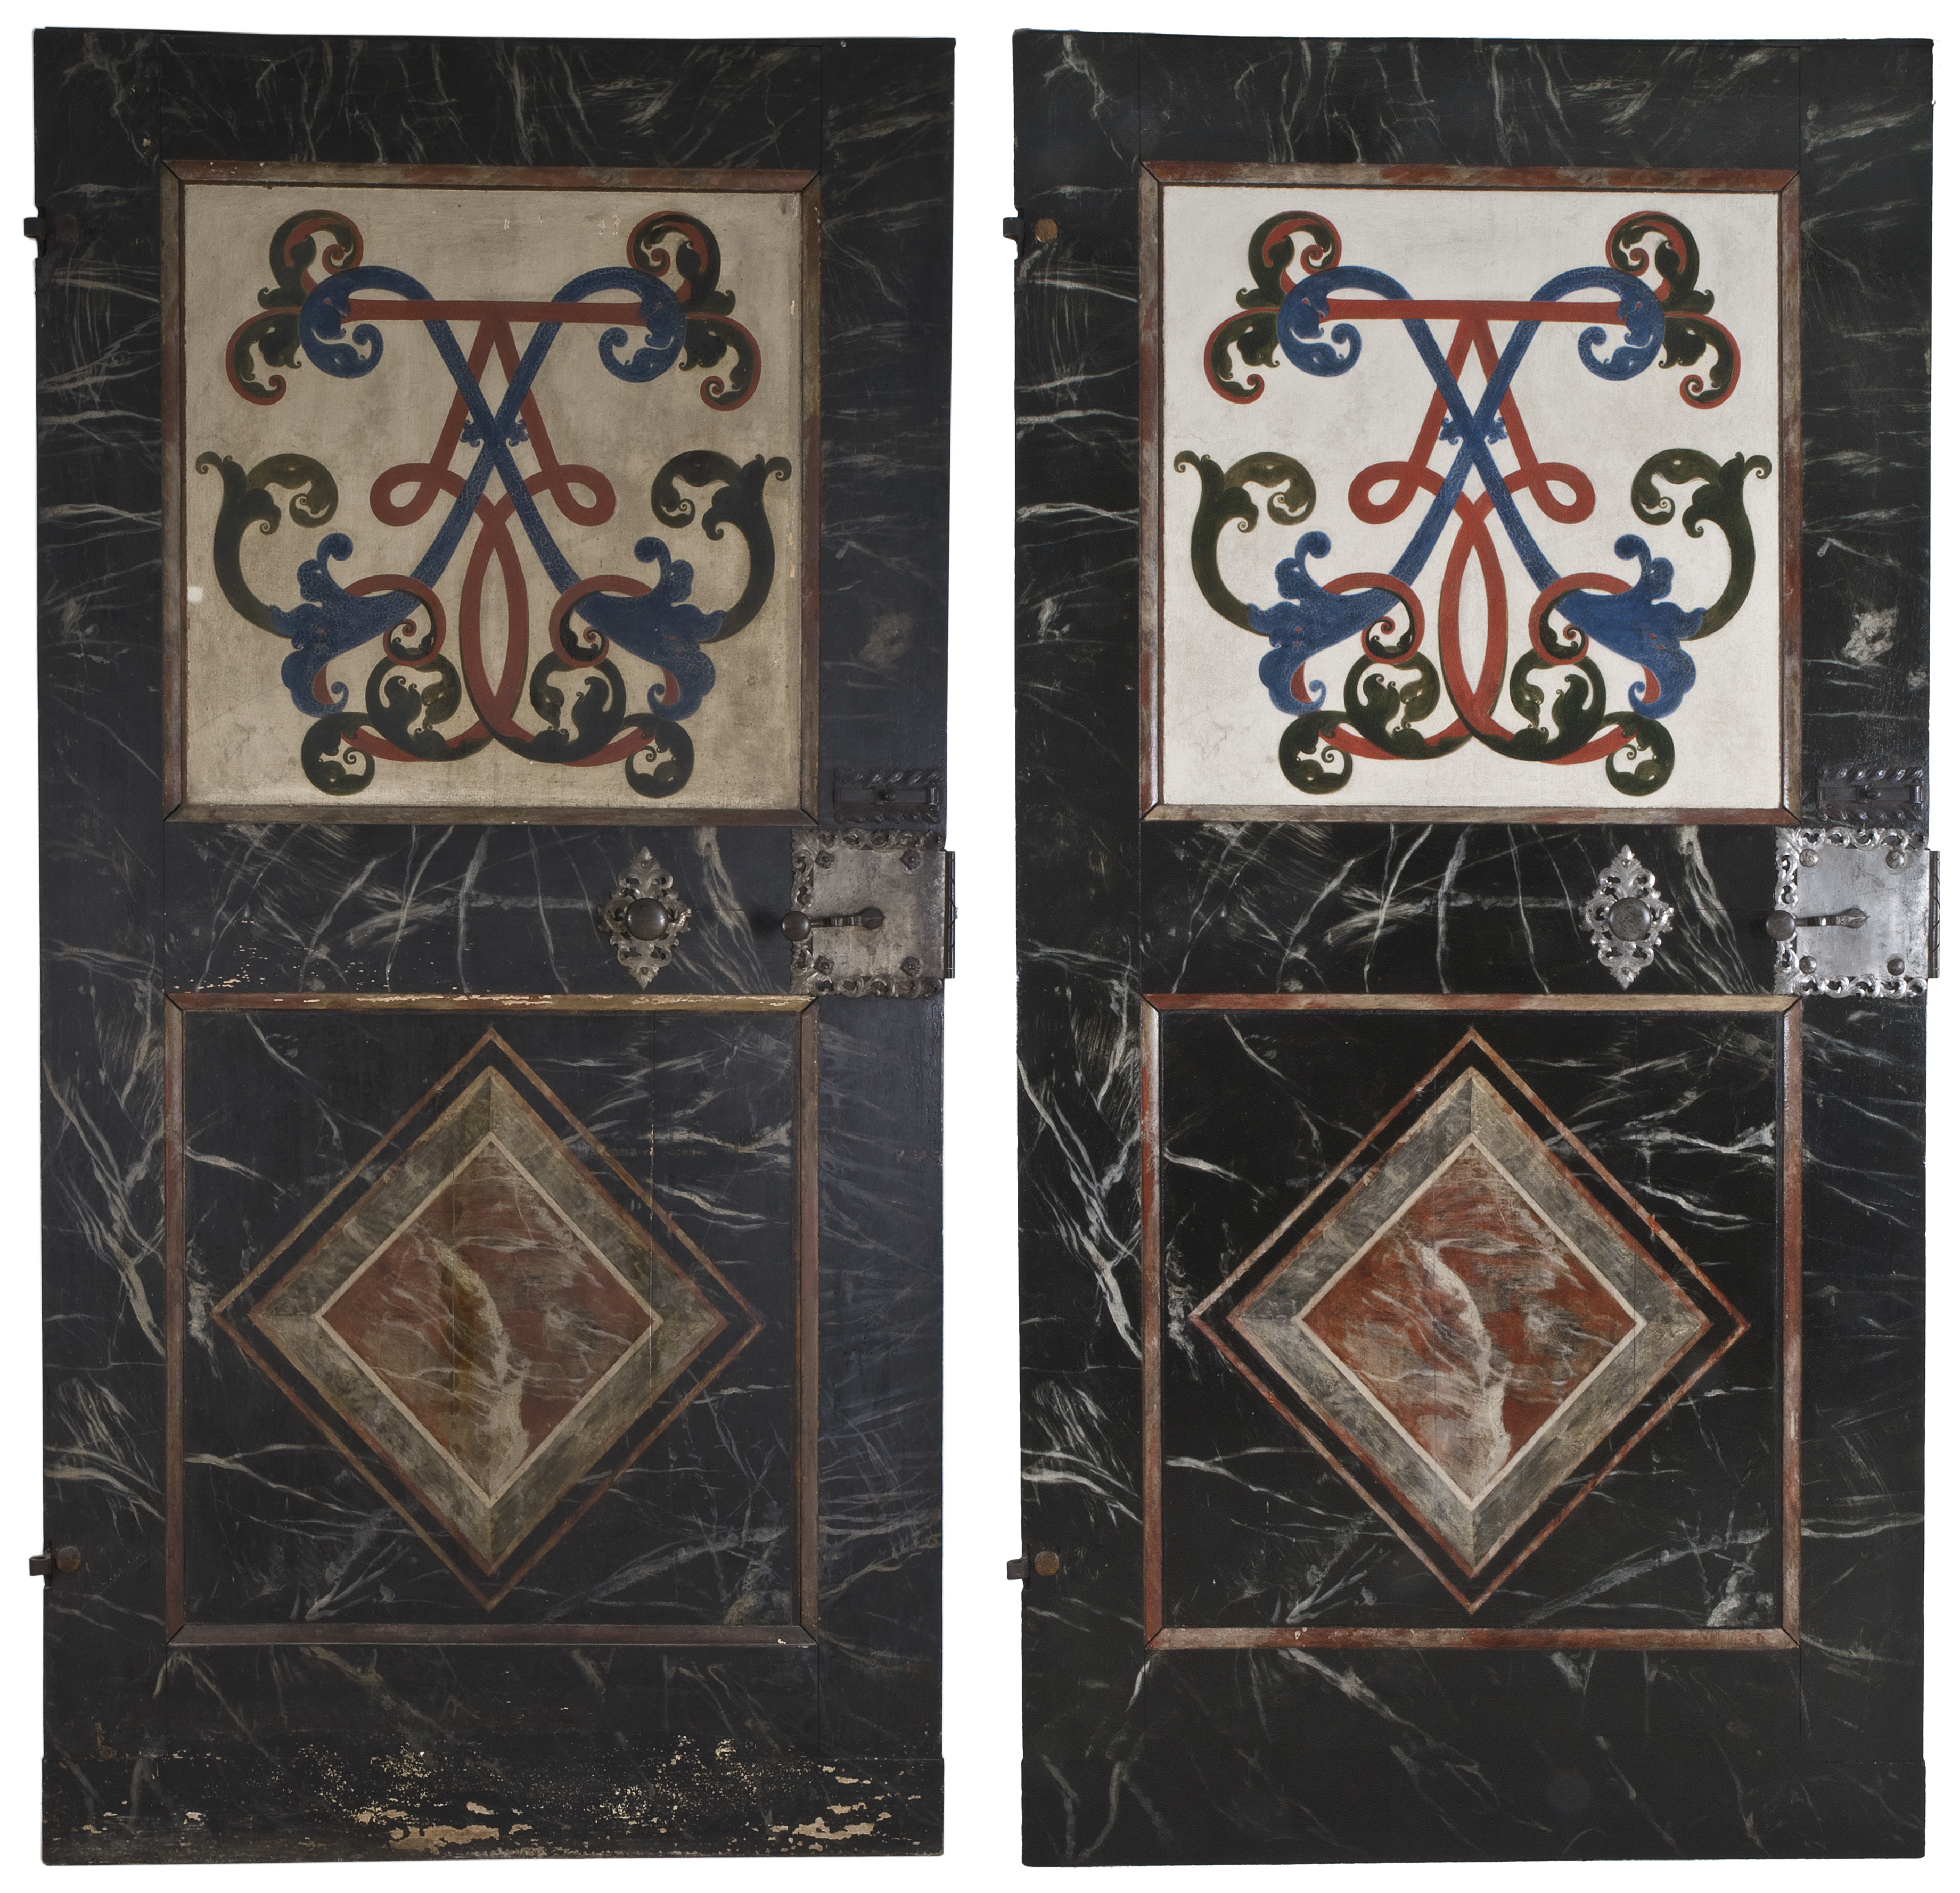
One of the six sides of the doors which are marbled. Before and after treatment.
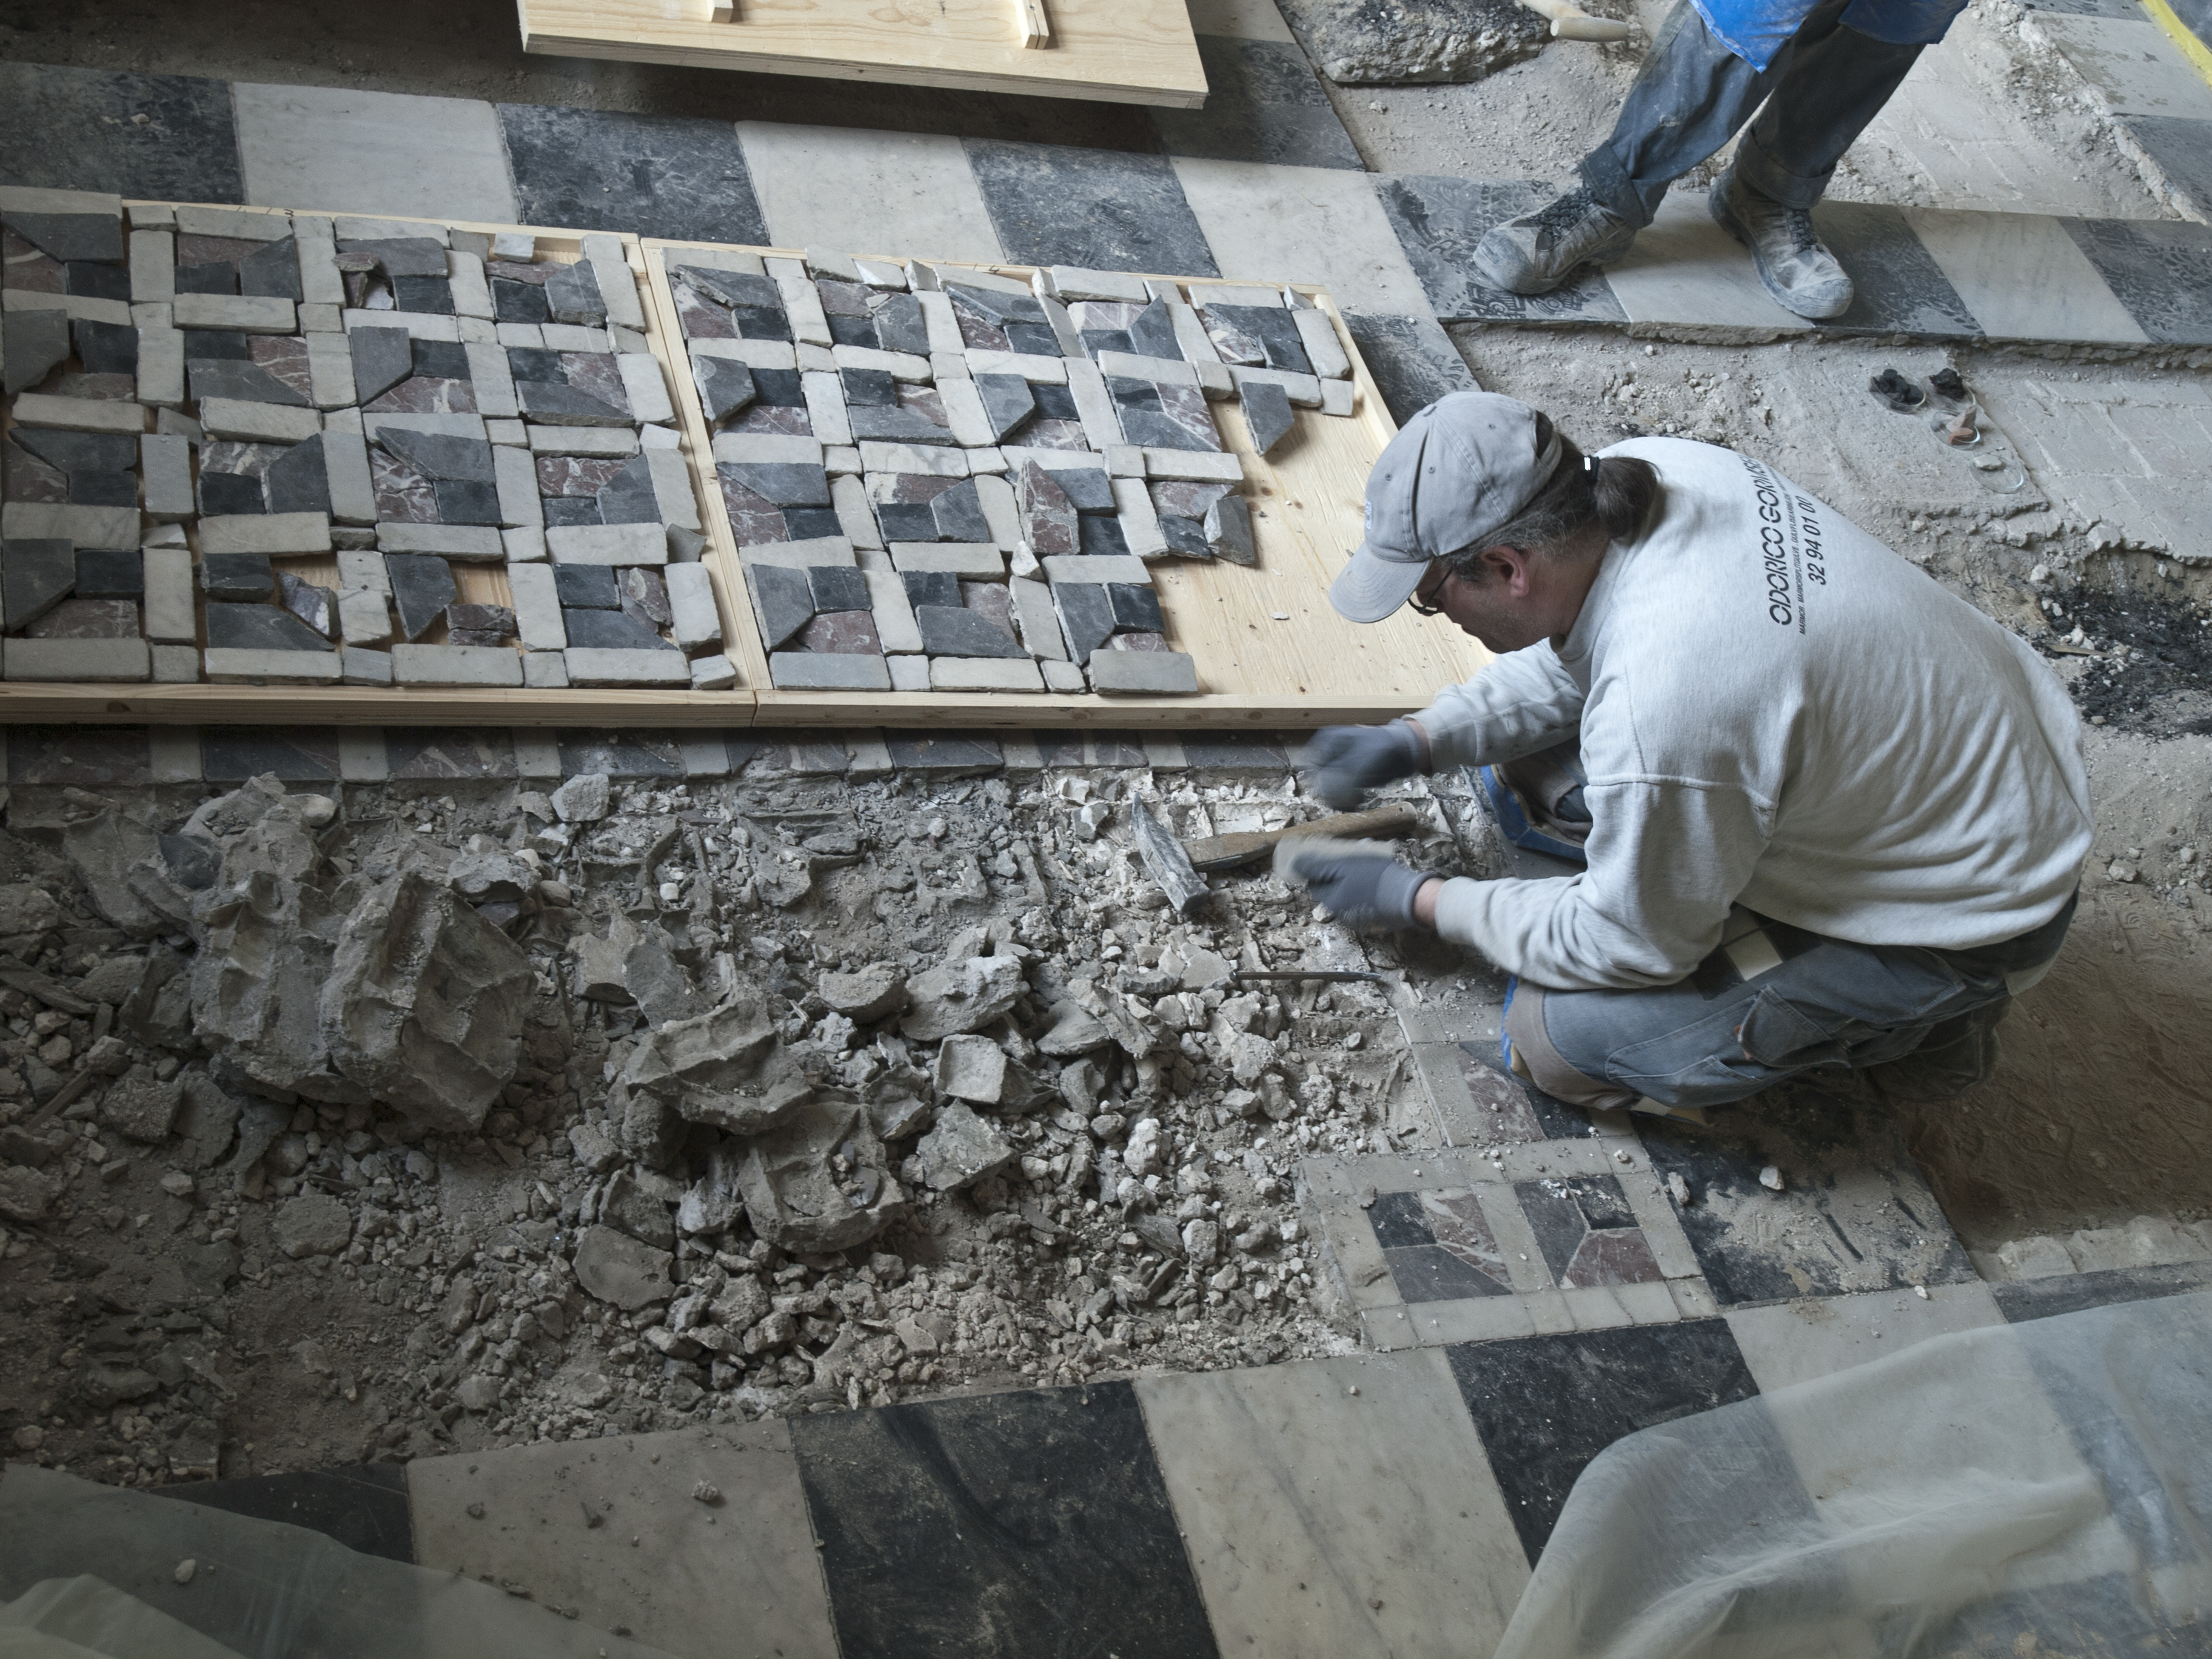
The Condition of the Floor
The floor is laid with tiles and mosaic of four different types of marble. Over time the floor had become rather uneven and many of the small mosaic tiles had broken and regularly came loose from the floor.

Detail of the floor before treatment.
The Treatment of the Floor
The fields of mosaic tiles were broken up and the cause of the large amount of damage to the mosaic was discovered. They had been laid on a thin layer of grout, which lay on top of a rather unstable layer of sand mixed with slag and bits of old debris. While the small mosaic tiles were removed the large marble tiles were allowed to remain. The ground of the mosaic fields was corrected. The broken stones were replaced with new ones, and together with the original stones they were placed in their original positions.
Laying the floor
The Room is Re-Inaugurated
The renovation of The Marble Chamber was completed without delays and was re-inaugurated by HM Queen Margrethe on her birthday, the 16th April 2012.
Watch the video of The Marble Chamber after renovation.